Revision 2022
Table of Contents
TARGET
Learn Sequelize constructing a project using Node.js, Express, Sequelize for persistence using PostgreSQL, MariaDB (MySQL) or another database. Source code to download using Node.js v.16: GitHub, node_sequelize_ultering_ml40643_1st_step
Project developed using Node.js version 16.
Node: 16.13.1
Package Manager: npm 8.5.4
OS: win32 x64 (Windows 10)
SUPER FAST START USING THE CODE FROM GITHUB AND ELEPHANTSQL
Howto:
sequelize_tutorial_fast_start
– help for debian install:
ultering_sequelize_tutorial_debian_install
GENERAL NOTES
1. The source code doesn’t include the node_modules folder content. Following the instructions, the node_modules content is automatically generated.
IMPORTANT NOTE:
JavaScript is a great language, but all languages have their weak point and fragilities. Backward compatibility is one of the JavaScript weaknesses.
Make sure that your environment is compatible with the env used for this tutorial.
2. The tutorial assumes Windows since it is the most used O.S. For Linux or Mac, you may just convert the system’s commands, but those pertaining to Node.js or npm commands are the same.
3. The $INSTALLDIR is the root dir where you’re supposed to place your project. For example, $INSTALLDIR=C:nodelab
4. The tutorial assumes that commands are issued on a prompt (console).
5. Although this tutorial uses PostgreSQL, it may be used any other database since the purpose of ORM is to provide a layer of abstraction for the database’s implementations. In this case, switch the configuration to match your choice, for instance, “dialect” property value must be replaced by the new value from your choice.
6. The code available for download was implemented using Node.js v.16. Please, use the same version.
PART 1 – CREATING THE PROJECT’S FOLDER
Choose a place to create the project’s root dir and do:
mkdir node
cd node
“node” comes to be the project’s root dir.
PART2 – CREATING AN EXPRESS PROJECT
Under the project’s root dir (node), run the commands below as follow:
npm install --save express express-generator

node_modules.binexpress -e -f

npm install --save
PART3 – INSTALLING NODEMON
Nodemon makes it easier to develop.
The project is started once, and each change on the code is compiled updating the project.
No need to restart. All projects from this series use Nodemon, but you may skip this step if desired.
If you have worked with Angular, it does the same as ng.
Under the project’s root dir, do:
npm install --save nodemon
Edit package.json file and add the following line:
"nodemon": "nodemon ./bin/www"
It becomes like this:
"scripts": {
    "start": "node ./bin/www",
    "nodemon": "nodemon ./bin/www"
  },
– Under project’s root dir, create a batch file “run.bat”, then edit it adding the following:
rem SET DEBUG=node:* & npm start
rem node binwww
SET DEBUG=node:*
npm run nodemon
Note: the commented lines (rem) are alternative commands.
If you are using *nix (linux flavor), create a similiar script (run.sh).
PART4 – INSTALL PostgreSQL/SEQUELIZE
IMPORTANT NOTE:
For the sake of simplicity, it is not required to create a local database for this tutorial.
Go to the PART8 (below), or check the source code (also below).
You may avoid creating the local database using the cloud instance offered here.
The setback is that if somebody else may be using at the same time, conflicts may happen.
In this case, just modify the table name from “user” to “myuser” or something else but I suppose this kind of conflict would be rare.
Installing potgres:
npm install --save sequelize sequelize-cli
npm install --save pg pg-hstore

Installing sequelize:
npm install --save sequelize sequelize-cli dotenv

If necessary:
npm audit fix --force

Note: dotenv is used to read envvars.
PART5 – RUNNING THE APP
Since this project is a very simple one, everything will be placed in just one file.
Open the file named “app.js” under the project’s root dir (under node):
Into this file, it is going to be placed the code to run the examples.
The app.js name is merely a convention.
It’s also usual to be named “index.js” and whatever.
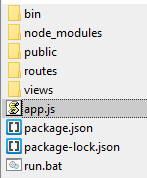
If everything is as it was supposed to be, your project’s root dir shall be like this:
The app.js content shall be like this:
var createError = require('http-errors');
var express = require('express');
var path = require('path');
var cookieParser = require('cookie-parser');
var logger = require('morgan');

var indexRouter = require('./routes/index');
var usersRouter = require('./routes/users');

var app = express();

// view engine setup
app.set('views', path.join(__dirname, 'views'));
app.set('view engine', 'ejs');

app.use(logger('dev'));
app.use(express.json());
app.use(express.urlencoded({ extended: false }));
app.use(cookieParser());
app.use(express.static(path.join(__dirname, 'public')));

app.use('/', indexRouter);
app.use('/users', usersRouter);

// catch 404 and forward to error handler
app.use(function(req, res, next) {
  next(createError(404));
});

// error handler
app.use(function(err, req, res, next) {
  // set locals, only providing error in development
  res.locals.message = err.message;
  res.locals.error = req.app.get('env') === 'development' ? err : {};

  // render the error page
  res.status(err.status || 500);
  res.render('error');
});

module.exports = app;
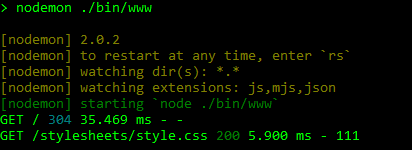
Execute the “run.bat”.
The site starts returning successfully and Nodemon keeps it up to date for each modification proceeded in the code.
Point to the site:
http://localhost:3000
If everything is all right, you get this on the browser:

Console output:
PART6 – PLAYING WITH SEQUELIZE
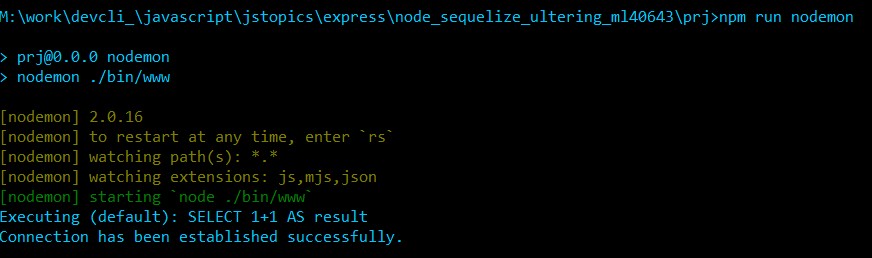
Testing the Sequelize’s Connection
Edit app.js file and place the code below before the “module.exports = app;” statement.
Follow the comments on the snippet below to understand how Sequelize works.
Notice that the example comes with a Postgre’s cloud service that may be used for fast checking.
Change the connection configuration pointing to your own database. Check the code under “instantiates” comment.
There is a topic at the end with details.
var pg = require('pg');
//or native libpq bindings
//var pg = require('pg').native

// instantiates
var Sequelize = require('sequelize')
  , sequelize = new Sequelize({
    username: "username",
    password: "secret",
    database: "usename",
    host: "xxx.elephantsql.com",
  port: 5432,
    dialect: "postgres"
});

// test the connection
sequelize
  .authenticate()
  .then(function(err) {
    console.log('Connection has been established successfully.');
  }, function (err) {
    console.log('Unable to connect to the database:', err);
  });
Server’s output:
Now that we made sure that the database connection is working fine, stop the application and we may go the next step.
Why Should I stop the app?
Remember that we are using nodemon.
Any change made in the code will restart the server automatically.
Sometimes, it is not desired. For instance, if you have the createDb=true, it will drop all instances and recreate them.
The data is lost.
Remember that the approach used here is didactic for the 1st step.
The model will evolve in the next steps.
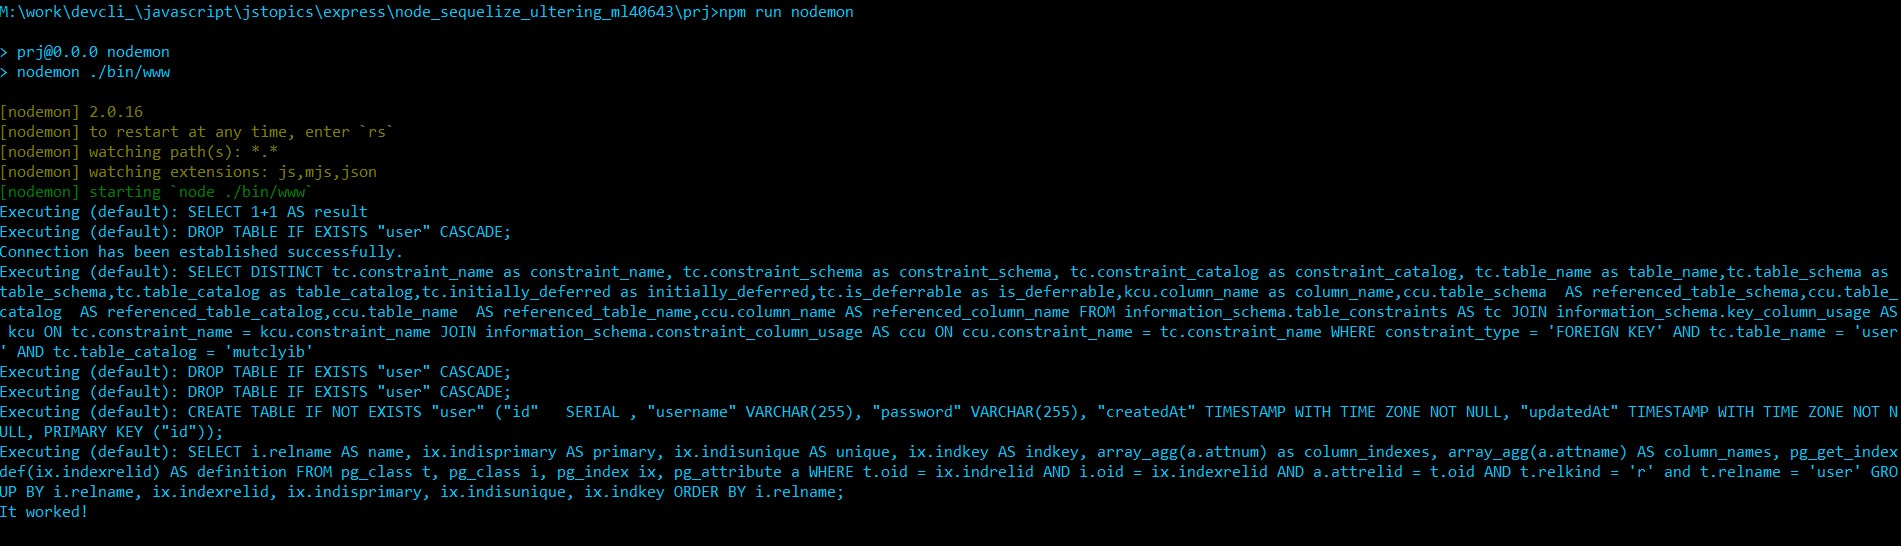
Creating Instances
When the app starts, the sequelize may create your table instances on the database, automatically.
The following code does that.
Add it just after the previous one and before the “module.exports = app;” statement.
Please, make sure that you’ve stopped the app (Ctrl+C), before appending the new code.
// Define a model to be used by the ORM.
var User = sequelize.define('User', {
username: Sequelize.STRING,
password: Sequelize.STRING
}, {
tableName: 'user', // this will define the table's name
//timestamps: false // this will deactivate the timestamp columns
})
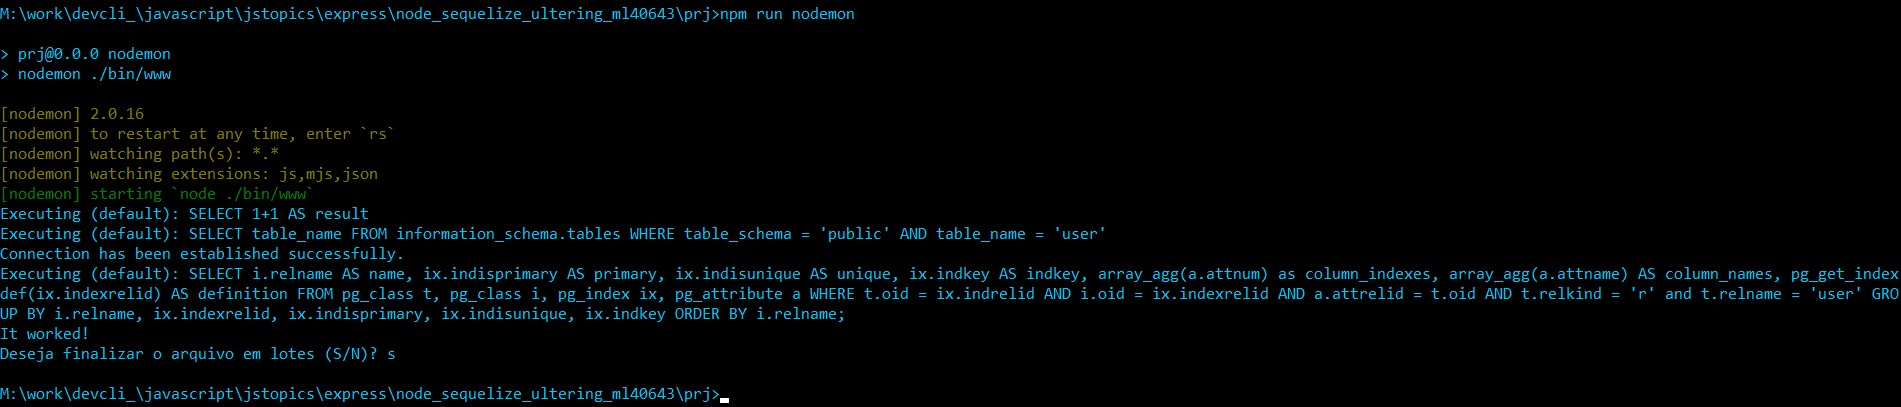
// PAY ATTENTION TO THIS VARIABLE: if true, sequelize recreates the tables.
var recreateDb = true;
sequelize
.sync({ force: recreateDb }) // if true, drops and recreates.
.then(function(err) {
console.log('It worked!');
}, function(err) {
console.log('An error occurred while creating the table:', err);
});
if (!recreateDb) {
User.create({
username: 'john-doe',
password: 'i-am-so-great'
}).then(function(user) {
console.log('[INFO]: john-doe persisted');
//console.log(User)
})
}
Start the application again:
run.bat
Server’s output:
IMPORTANT:
After the instance is created, switch to false the recreateDB var:
var recreateDb = false;
Each time that you execute the code (or change it) using the configuration where force = true, the table (or tables) is recreated losing its previous content.
To avoid this, switch the flag to false:
sequelize.sync({ force: false })
…
Check the commented code to take advantage of additional features, uncommenting the chunks to check how it works.
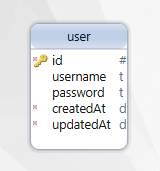
Check To The Datase And Check The Instance Created
Connect to the database using a tool.
In this tutorial I am using DBeaver.
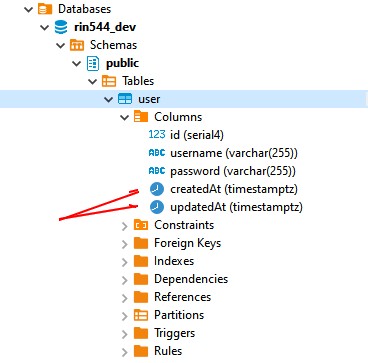
Notice the red arrows. Those fields were created by sequelize.
Running Again Using createDB turned to false
Stop the app (Ctrl+C).
Go to your code and switch to false the recreateDB var.
var recreateDb = false;

The server’s output:
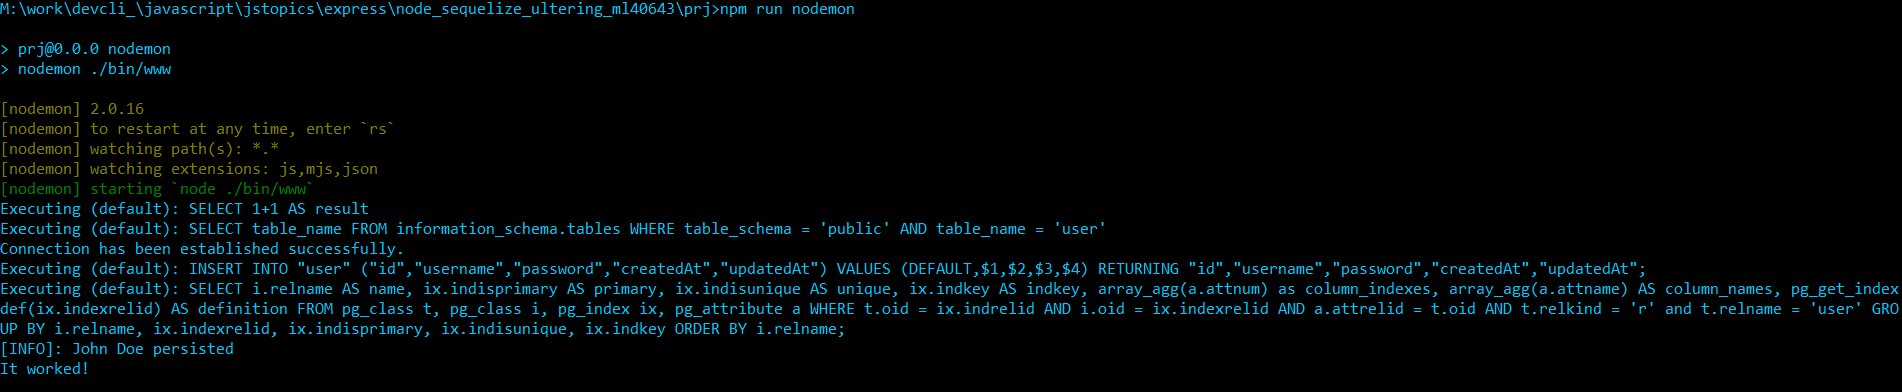
Inserting Data
Append the code below right after the last one and always before the modules.export.
User.create({
  username: 'John Doe',
  password: 'secret'
}).then(function (user) {
  console.log('[INFO]: John Doe persisted');
  //console.log(User)
})
The server’s output:
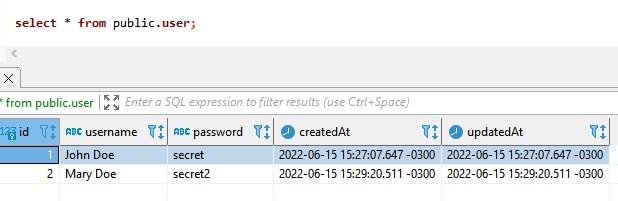
Go to the database and check if the instance was created.

Ok! Success.
Again. Stop the service to modify it.
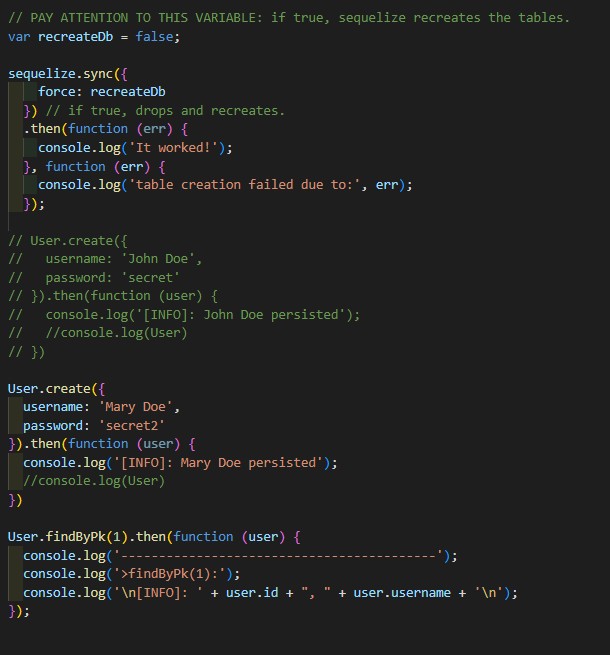
Find An Instance By Primary Key
Again, stop the service (Ctrl+C).
Comment the table that creates a user or modiffy its data, as you wish.
Append the follwing snippet before the modules.export statement (module.exports = app;).
  User.findByPk(1).then(function (user) {
    console.log('------------------------------------------');
    console.log('>findByPk(1):');
    console.log('n\[INFO]: ' + user.id + ", " + user.username + '\n');
  });
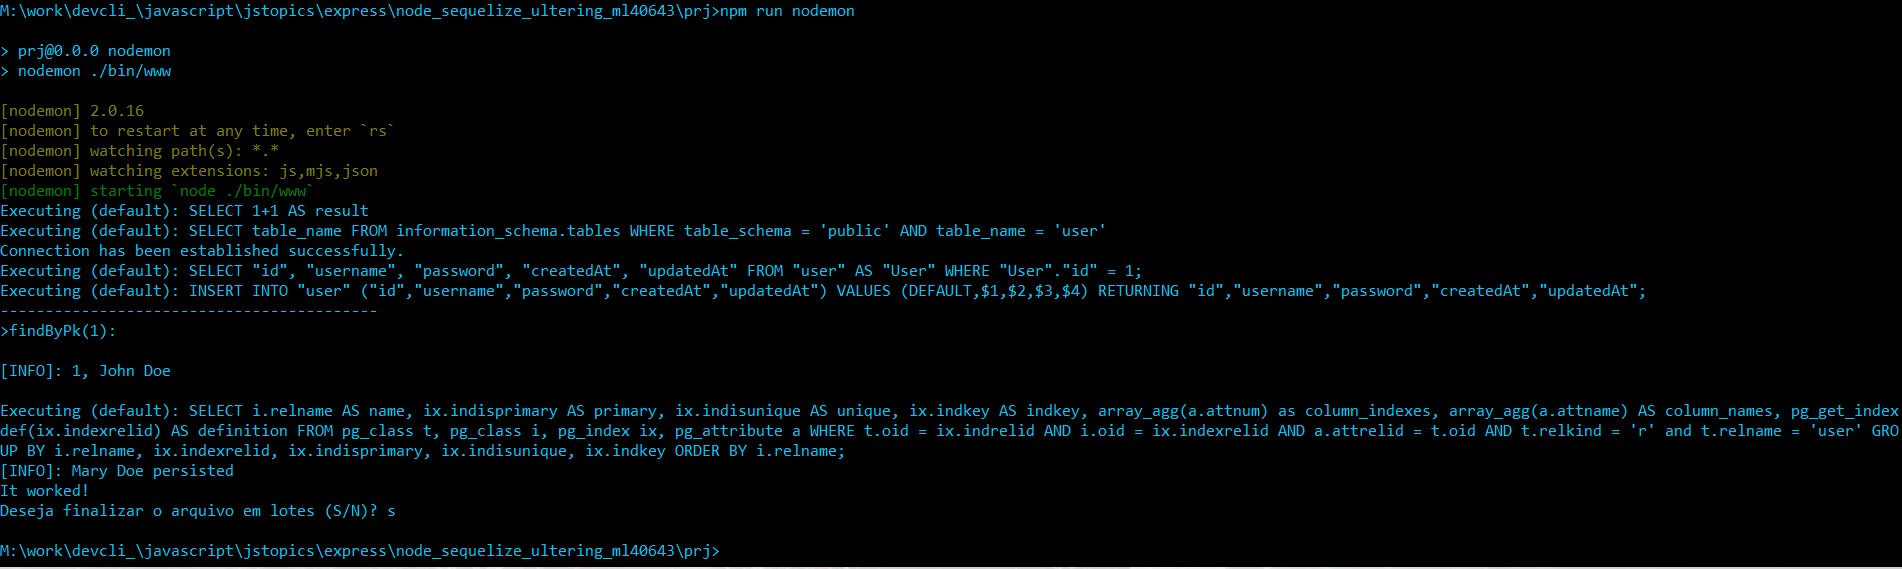
I preferred to modify the data to create one more instance (Mary Doe).
The server's output:
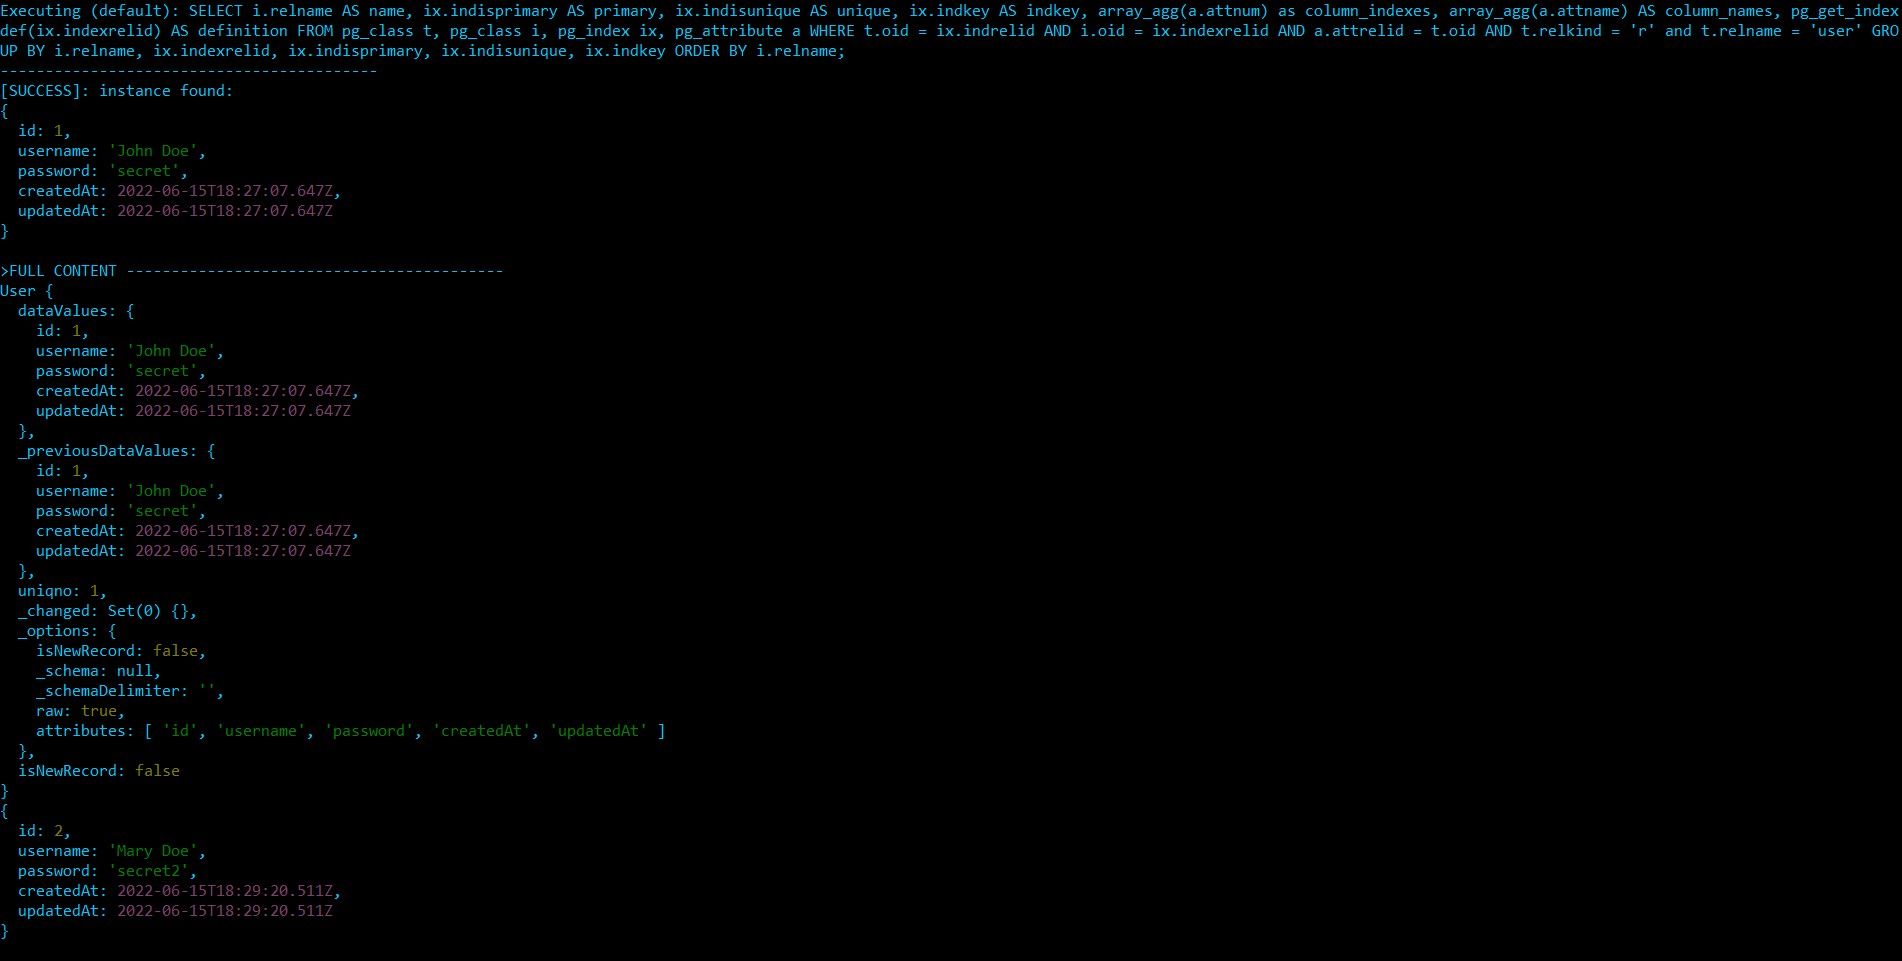
Find by User’s name
Stop the server and comment the previous code, and append the next (below):
// find by username
const users = User.findAll({
  where: {
    username: 'John Doe'
  }
}).then(function (data, err) {
  if(!data) {
    console.log('------------------------------------------');
    console.log('[FAIL]: user instance not found due to: ' + err);
    console.log('------------------------------------------');
  } else {
    console.log('------------------------------------------');
    console.log('[SUCCESS]: instance found: ');
    for (u of data) {
      console.log(u.dataValues);
      console.log('\n>FULL CONTENT ------------------------------------------');
      console.log(u);
    }
  }
})

Run the server:
run.bat

List All Instances
Again, stop the service (Ctrl+C).
Comment the code used in the previous step and append this new one, then run again.
// find all
const list = User.findAll().then(function (data, err) {
  if(!data) {
    console.log('------------------------------------------');
    console.log('[FAIL]: user instance not found due to: ' + err);
    console.log('------------------------------------------');
  } else {
    console.log('------------------------------------------');
    console.log('[SUCCESS]: instance found: ');
    for (u of data) {
      console.log(u.dataValues);
      console.log('\n>FULL CONTENT ------------------------------------------');
      console.log(u);
    }
  }
})
PART7 – EXTRA: Going further…
Additional links to increase your knowledge:
sequelize.readthedocs.io/en/rtd/articles/getting-started/
sequelize.readthedocs.io/en/rtd/docs/models/
sequelize.org/master/class/lib/model.js~Model.html
PART8 – DATABASE CONNECTION SETUP – DETAILS
OPTION #1 – Using cloud service
If you don’t wish to install PostgreSQL on your machine or server, you may use a cloud service.
If not, please skip this section and go to “option 2”.
ElephantSQL is PostgreSQL as a service and it is an easy and fast alternative to set a database instance.
Insert the code ( below) that is responsible for the connection with the database instance between the placeholders ( “// PLACEHOLDER FOR…”), before “module.exports = app;”.
var Sequelize = require('sequelize')
  , sequelize = new Sequelize({
    username: "username",
    password: "secret",
    database: "usename",
    host: "xxx.elephantsql.com",
    port: 5432,
    dialect: "postgres"
});
Alternatively, you may replace app.js from the downloaded code with this file “app_elephantsql.7z”.
OPTION #2 – Using local database Instance
If using local PostgreSQL instance, the Sequelize configuration follows below instead of that shown in “option 1”.
Edit app.js file and set the code responsible for the connection with the database instance between the placeholders that begins at “// PLACEHOLDER FOR SEQUELIZE’S CODE” and ends before “module.exports = app;”.
LOCAL DATABASE
var Sequelize = require('sequelize'),
  sequelize = new Sequelize({
    username: "postgres",
    password: "postgres",
    database: "rin544_dev",
    host: "localhost",
    port: 5432,
    dialect: "postgres"
  });
Assuming that you have PostgreSQL installed, go to the project’s root dir and run the commands below to create the database instance.
createdb -O postgres -Upostgres rin544_dev
– Checking:
psql -Upostgres -W
\l
– If using MariaDB or MySQL, do:
mysqladmin -uroot -pmysql create rin544_dev
– Checking:
mysql -uroot -p
show databases;
SOURCE CODE
app.js
Source code to download using Node.js v.16: GitHub, node_sequelize_ultering_ml40643_1st_step
INDEX:
NODE.JS: SEQUELIZE SERIES
Brazilian system analyst graduated by UNESA (University Estácio de Sá – Rio de Janeiro). Geek by heart.