Angular From Scratch Tutorial – Index
PREVIOUS: Angular From Scratch Tutorial – Step 2: Components
NEXT: Angular From Scratch Tutorial – Step 4: Adding Bootstrap
Table of Contents
TARGET
The purpose of this page in this tutorial series is to provide a very fast approach that is useful for revisions when you have already dealt with Angular, but after an absense of using it, it turns necessary to do a “disk swap” bringing from “disk” to your “memory” again. 🙂
If it is your first Angular approach, or you are a newbie, it is recommended to go first to the Angular’s documentation. After, this page will serve you as a summary for fast referencing and revision.
CONVENTIONS
About the notation adopted in this project.
The code created for this project has an “app” prefix.
Code, projects, implementations in general from external sources hasn’t this prefix.
SUMMARY
Binding is a key interaction concept.
It must be kept in mind the several ways it may occur.
This tutorial basically summarizes Angular documentation.
Useful for fast revisions.
TARGET
Binding handling.
Providing routing to the moved content creating a link to it.
Source Code/Download
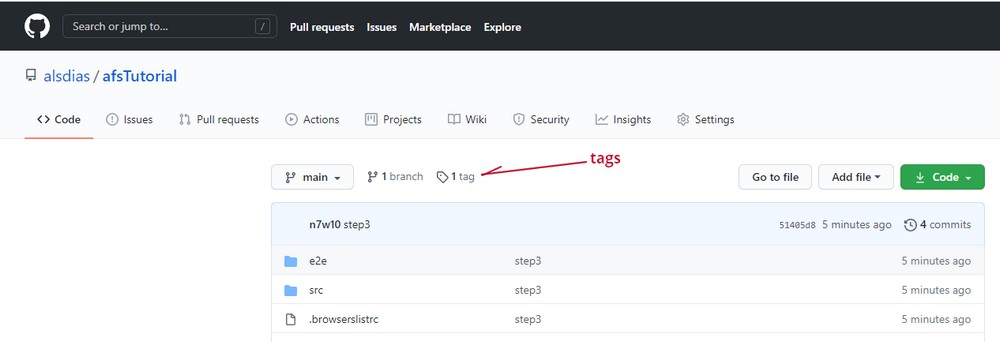
For more details, the source code may be found on GitHub, “step3” tag (includes step1 up to step3).
DATA BINDING
Data Binding allows apps to display data values to a user and respond to user actions (such as clicks, touches, and keystrokes).
Forms of binding in Angular’s Template Syntax
- Interpolation
- Property binding
- Event binding
- Attribute binding
- Class and style binding
- Style binding
- Two-way data binding with ngModel
@FROM: Angular documentation
TARGET FOR THIS STEP
Implementation of data binding types.
SOURCE CODE
Since this step includes additional files, to make easier its implementation, the respective source code may be cloned from GitHub.
How to Use
The master branch contains the last current version.
To get this step (step3), do:
- Get a list of all available local tags (your machine):
git tag - Get a list of all available remote tags (on GitHub’s server).:
git ls-remote –tags origin - To checkout the step3 tag:
git checkout tags/step3
INTERPOLATION
Edit “app.component.html” to add title, setting it like this:
The title’s value comes from “app.component.ts”:
Test
http://localhost:4200/
Interpolation is simple like that.
It is used a double curl brace in the HTML file for a class property defined in the .ts file.
PROPERTY BINDING
To bind to an element’s property, enclose it in square brackets, [], which identifies the property as a target property.
A target property is the DOM property to which you want to assign a value.
The brackets, [], cause Angular to evaluate the right-hand side of the assignment as a dynamic expression.
Without the brackets, Angular treats the right-hand side as a string literal and sets the property to that static value.
[Angular documentation]
Binding a property
Edit “app.component.ts” and create the siteBadge property as follows:
export class AppComponent {
  title = 'afsTutorial';
  siteBadge = '../assets/img/afstutorial_main_image.jpg';
}
Bind it to the HTML file (app.component.html):
<h2>{{title}}</h2>
<img [src]="siteBadge">
<router-outlet></router-outlet>
Point to the main page:
http://localhost:4200/
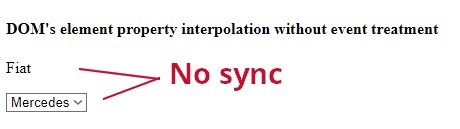
DOM’s element property interpolation
When the page loads, the “carSelection.value” is “Fiat” by default.
If the selection is switched, it won’t switch the “carSelection.value” because it is necessary to assign an event that performs the update.
<h4>DOM's element property interpolation without event treatment</h4>
<p> {{carSelection.value}} </p>
<select #carSelection>
  <option value="Fiat">Fiat</option>
  <option value="Hyundai">Hyundai</option>
  <option value="Mercedes">Mercedes</option>
</select>
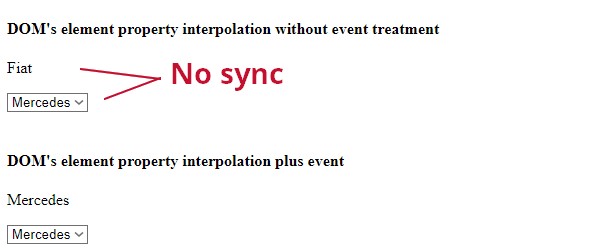
DOM’s element property interpolation plus event
To make it dynamic just add to the select element the following:
(input)="0"<h4>DOM's element property interpolation plus event</h4>
<p> {{carSelection2.value}} </p>
<select #carSelection2 (input)="0">
<option value="Fiat">Fiat</option>
<option value="Hyundai">Hyundai</option>
<option value="Mercedes">Mercedes</option>
</select>
Binding to a DOM’s element property
Suppose you’re working with legacy code(very common, by the way), and you need to handle dynamically some attribute of a table’s row.
For instance, we may suppose the following alternatives:
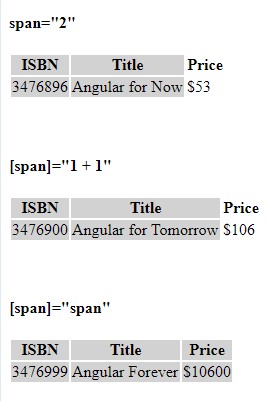
CASE 1: The snippet below is a static interpolation that may be replaced by property binding to turn into a dynamic interpolation or binding.
Notice that it must be used the element’s property native name that uses camel case (span) and not something different from that like “Span”.
<tr><td span="{{1 + 1}}">Three-Four</td></tr>
CASE 2: Using the element’s binding and the property binding together:
Supposing that the app.component.ts file has span attribute as follows:
export class AppComponent {
  title = 'afsTutorial';
  siteBadge = '../assets/img/afstutorial_main_image.jpg';
  span = 3;
}
The full HTML code (app.component.html) becomes:
<br />
<br />
<h4>[span]="1 + 1"</h4>
<table>
  <colgroup>
    <col [span]="1 + 1" style="background-color:#D2D2D2">
  </colgroup>
  <tr>
    <th>ISBN</th>
    <th>Title</th>
    <th>Price</th>
  </tr>
  <tr>
    <td>3476900</td>
    <td>Angular for Tomorrow</td>
    <td>$106</td>
  </tr>
</table>

<br />
<br />
<h4>[span]="span"</h4>
<table>
  <colgroup>
    <col [span]="span" style="background-color:#D2D2D2">
  </colgroup>
  <tr>
    <th>ISBN</th>
    <th>Title</th>
    <th>Price</th>
  </tr>
  <tr>
    <td>3476999</td>
    <td>Angular Forever</td>
    <td>$10600</td>
  </tr>
</table>
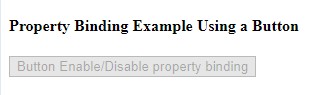
Button’s Property Binding Example
- The HTML code in .html file:
<button [disabled]="buttonDisabled"></button>

- The JavaScript code for the class property in the respective .ts file:
buttonDisabled = true;
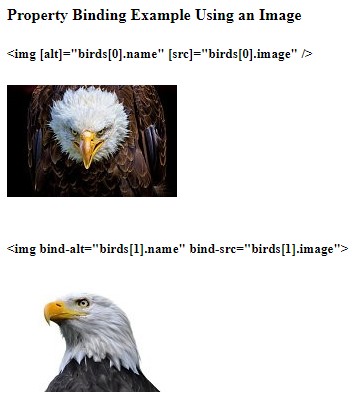
Example using an image
app.component.html:
<h4>Property Binding Example Using an Image </h4>
<h5>
  <img [alt]="birds[0].name" [src]="birds[0].image" />
</h5>
<img [alt]="birds[0].name" [src]="birds[0].image" />
<br /><br />

<h5>
  <img bind-alt="birds[1].name" bind-src="birds[1].image">
</h5>
<img bind-alt="birds[1].name" bind-src="birds[1].image">
<br /><br />
app.component.ts:
birds = [{
name: ‘Eagle #1’,
image: ‘../assets/img/eagle1.jpg’
}, {
name: ‘Eagle #2’,
image: ‘../assets/img/eagle2.jpg’
}];
Example handling an element’s property
app.component.html:
app.component.ts:
Other Examples
WRONG: the new operator:
<p> {{ new Date() }} </p>
Also, not allowed JavaScript expressions that have side effects:
like containing =, +=, -=, etc.
Operators: instanceOf, typeOf, for, while, etc.
Chaining statements using ‘;’ or ‘,’
Increment and decrement expressions like ++ and —
RIGHT
.html file:
<p> {{ convertToDate() }} </p>
.ts file:
function convertToDate(){
      const date = new Date();
      return date.toLocaleDateString();
}
Working with CSS
Alternatives
By snippets of the examples:
[style]=’navStyle’[style.color]=”color”
[attr.colspan]=”1 + 1″
[ngStyle]=”pHighlight”
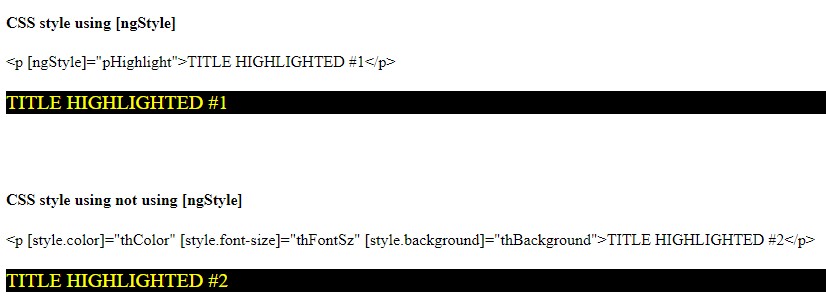
ngStyle
app.component.html:
<h4>CSS style using [ngStyle]</h4>
<p [ngStyle]="pHighlight">TITLE HIGHLIGHTED #1</p><br />
<p [ngStyle]="pHighlight">TITLE HIGHLIGHTED #1</p>
<br /><br />
<h4>CSS style not using [ngStyle]</h4>
<p [style.color]="thColor" [style.font-size]="thFontSz" [style.background]="thBackground">TITLE HIGHLIGHTED #2</p><br />
<p [style.color]="thColor" [style.font-size]="thFontSz" [style.background]="thBackground">TITLE HIGHLIGHTED #2</p>
<br /><br />
app.component.ts:
  pHighlight = {
    color: 'yellow',
    fontSize: '20px',
    background: 'black'
  };

  thColor = 'yellow';
  thFontSz = '20px';
  thBackground = 'black';
See More:
Attribute binding
ANGULAR ATTRIBUTES SUMMARY
Some important angular attributes:
1. **[ngModel]**:
This attribute is used for two-way data binding in forms.
It binds a model property to an input element, allowing changes in the input to update the model and vice versa.
“`html
<input type=”text” [(ngModel)]=”name”>
“`
2. **(click)**:
This attribute is used to bind a method to the click event of an element.
“`html
<button (click)=”onClick()”>Click me</button>
“`
3. **[ngClass]**:
This attribute allows dynamically adding or removing CSS classes based on certain conditions.
“`html
<div [ngClass]=”{‘active’: isActive, ‘disabled’: isDisabled}”>Content</div>
“`
4. **[ngStyle]**:
This attribute allows dynamically applying inline styles to an element based on certain conditions.
“`html
<div [ngStyle]=”{‘color’: isActive ? ‘green’ : ‘red’, ‘font-size.px’: fontSize}”>Content</div>
“`
5. ***ngFor**:
This is a structural directive used for iterating over a collection and rendering each item.
“`html
<ul>
<li *ngFor=”let item of items”>{{ item }}</li>
</ul>
“`
6. ***ngIf**:
This is a structural directive used for conditionally rendering elements based on a boolean expression.
“`html
<div *ngIf=”isVisible”>Content</div>
“`
7. **[routerLink]**:
This attribute is used to navigate between different routes in an Angular application.
“`html
<a [routerLink]=”[‘/home’]”>Home</a>
“`
These are just a few examples of how attributes are used in Angular templates to achieve different functionalities.
Angular provides a rich set of built-in directives and attributes to make building dynamic web applications easier.
(By ChatGPT)
attr.
In Angular, the `attr.` prefix is used to dynamically set or bind HTML attributes on elements.
This is particularly useful when you want to set attributes conditionally or when the attribute name is dynamic or not directly supported by Angular’s binding syntax.
Here’s how you can use the `attr.` prefix in Angular:
“`html
<button [attr.disabled]=”isDisabled ? true : null”>Disabled Button</button>
“`
In this example, the `disabled` attribute of the `<button>` element will be set if `isDisabled` evaluates to true. If `isDisabled` is false, the `disabled` attribute will not be added to the element. The `null` value is used to remove the attribute if it’s not needed.
You can also use `attr.` with dynamically generated attribute names:
“`html
<input [attr.data-custom]=”customData”>
“`
In this case, if `customData` is a variable in your component containing the name of the attribute and its value, it will be dynamically set on the `<input>` element.
Using `attr.` in Angular gives you flexibility in managing attributes dynamically, enabling you to build more dynamic and interactive web applications.
(By ChatGPT)
Calculated Expressions
<!--  expression calculates colspan=2 -->
<tr><td [attr.colspan]="1 + 1">One-Two</td></tr>
class.
style.
@Component({
  selector: 'app-nav-bar',
  template: `
<nav [style]='navStyle'>
  <a [style.text-decoration]="activeLinkStyle">Home Page</a>
  <a [style.text-decoration]="linkStyle">Login</a>
</nav>`
})
export class NavBarComponent {
  navStyle = 'font-size: 1.2rem; color: cornflowerblue;';
  linkStyle = 'underline';
  activeLinkStyle = 'overline';
  /* . . . */
}
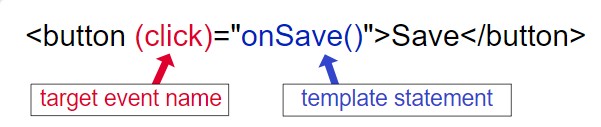
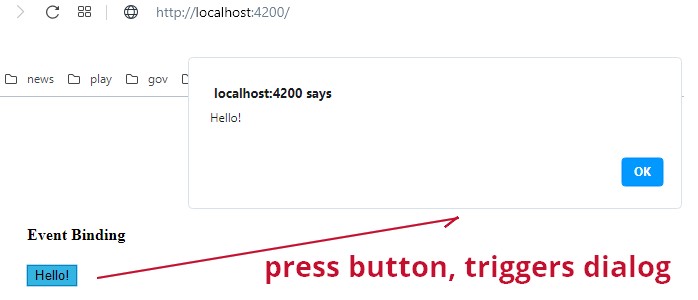
EVENT BINDING
Above, it was already shown an event binding using (input)=”0″.
Let’s see others.
A simple event binding works like this, according to Angular documentation:
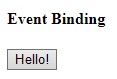
Example
app.component.html:
Parent-Child Relationship – Sending data from Parent to Child
This tutorial has a very fast approach, useful for revisions and fast learning, but sometimes, when the concept is a little more tricky, may be helpful to extend the approach.
If desired detailed information, please take a look at @Input/@Output documentation.
Also, you may check other sources referenced below under Credits topic, at the page’s bottom.
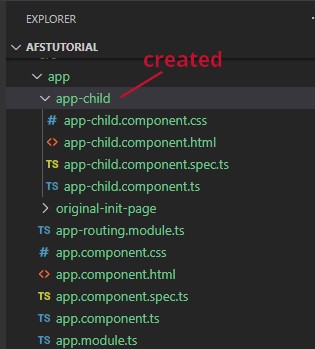
To go ahead, it is necessary to create app’s child, run on prompt, under project’s root folder, the following command:
ng g c app-child
Result:
Example
1. Edit app.component.ts and declare childName just after class declaration. Example:
export class AppComponent {
  childName = 'app-child';
error TS2339: Property ‘childName’ does not exist on type ‘AppComponent’.
So, when having this kind of compilation issue, try to move the not recognized property to a closer position to the class declaration.
2. Edit app-child.component.ts and add:
Edit app-child.component.html and replace the default code with:
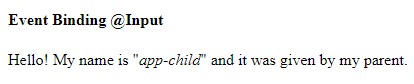
3. Edit app.component.html and set:
<h4>Event Binding @Input</h4>
<app-app-child [myName]="childName"></app-app-child>
Go to the app-child.component.ts file and check its selector name:
@Component({
  selector: 'app-app-child',
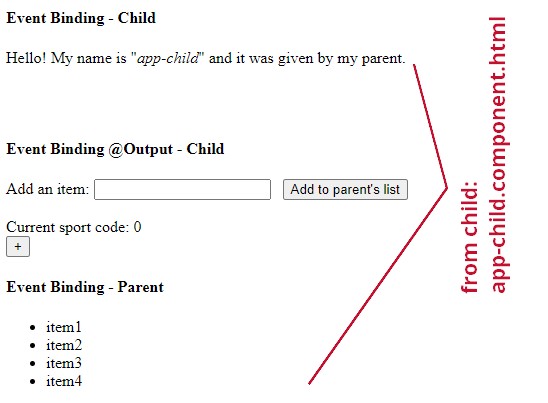
4. Result:
Parent-Child Relationship sending data from child to parent using EventEmitter, @Output
This example comes from Angular doc where you may find additional information.
Here, the example is summarized to attend the purpose of this post (revision/fast learning).
Some small changes were done to adjust to the current sequence ot the tutorial.
1. Add to app-child.component.ts:
@Output() newItemEvent = new EventEmitter<string>();
  addNewItem(value: string): void {
    this.newItemEvent.emit(value);
  }
Obs.:
a. It is used the import already created in the previous topic.
b. EventEmitter<string>—the @Output()‘s type
2. Add to app-child.component.html:
<label>Add an item: <input #newItem></label>
<button (click)="addNewItem(newItem.value)">Add to parent's list</button>
3. Add to app.component.ts:
items = ['item1', 'item2', 'item3', 'item4'];  // set this with the other properties, near to class definition.

// append the method to the end of the file
addItem(newItem: string): void {
	this.items.push(newItem);
}
4. Append to app.component.html:
The highlighted code is the prior code used in the previous topic.
Now, as part of our exercise, we are going to “merge” both examples into just one, since we are using the same output element (app-app-child).
Follow by the images.
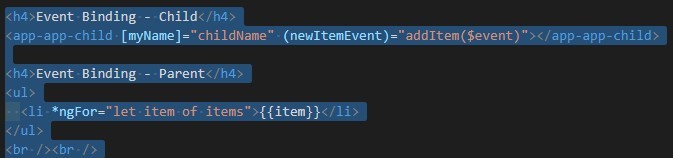
BEFORE
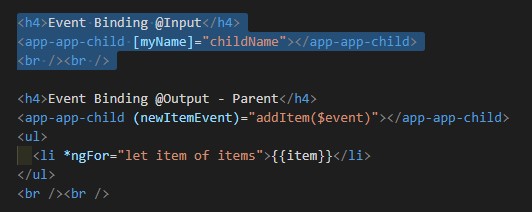
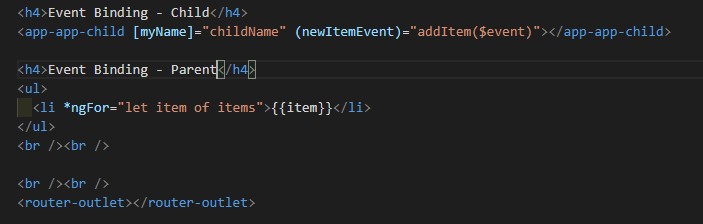
AFTER
<h4>Event Binding - Child</h4>
<app-app-child [myName]="childName" (newItemEvent)="addItem($event)"></app-app-child>

<h4>Event Binding - Parent</h4>
<ul>
  <li *ngFor="let item of items">{{item}}</li>
</ul>
<br /><br />
RESULT
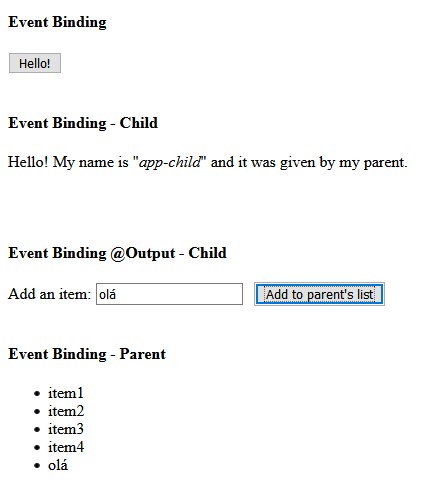
The “olá” (portuguese word for hello) is pushed into the items array when the button is pressed.
You, see! Here you also learn portuguese! 
Ok! Let’s go ahead because there is still road to run!!
Two-way Binding: @Input() and @Output() together
Angular documentation – Two-way binding
How two-way data binding works
In this kind of binding the data is passed to the child and vice-versa.
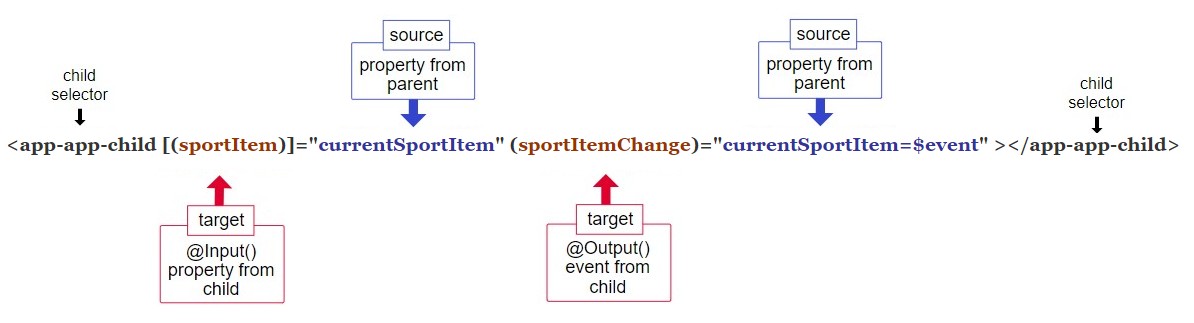
*** IMPORTANT NOTE:
To make it work, there is a rule: the event name must follow a syntax that is the concatenation of the “@Input” attribute name plus the “Change” suffix.
Example:
  @Input()  sportCode: number;
  @Output() sportCodeChange = new EventEmitter<number>();

  sportItens = ['ball', 'football boots', 'shirt', 'shorts', 'sockets'];
  @Input()  sportItem: string;
  @Output() sportItemChange = new EventEmitter<string>();
Two-way Binding – parent property vs. child property
PREVIOUS CODE TO BE REFACTORED (app.component.html BEFORE)
AFTER REFACTORING (app.component.html AFTER)
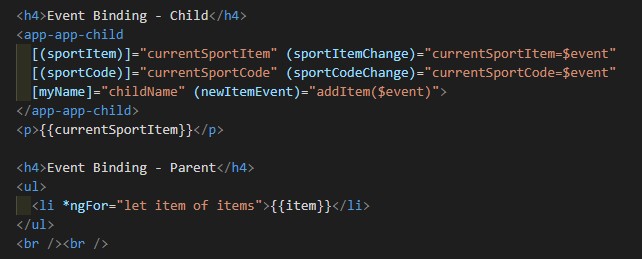
<app-app-child
	[(sportItem)]="currentSportItem" (sportItemChange)="currentSportItem=$event"
	[(sportCode)]="currentSportCode" (sportCodeChange)="currentSportCode=$event"
	[myName]="childName" (newItemEvent)="addItem($event)">
</app-app-child>
PARENT IMPLEMENTATION (app.component.ts)
currentSportCode = 0;
CHILD IMPLEMENTATION (app-child.component.ts)
 sportItens = ['ball', 'football boots', 'shirt', 'shorts', 'sockets'];

  @Input()  sportCode: number;
  @Output() sportCodeChange = new EventEmitter<number>();

  @Input()  sportItem: string;
  @Output() sportItemChange = new EventEmitter<string>();

// ...

  inc(): void {
    this.sportCode  += 1;
    this.nextCode(this.sportCode);
    this.nextItem(this.sportCode);
  }

  nextCode(num: number): void {
    this.sportCode =  (this.sportCode % 5);
    this.sportCodeChange.emit(this.sportCode);
  }

  nextItem(idx: number): void {
    this.sportItem = this.sportItens[idx];
    this.sportItemChange.emit(this.sportItem);
  }
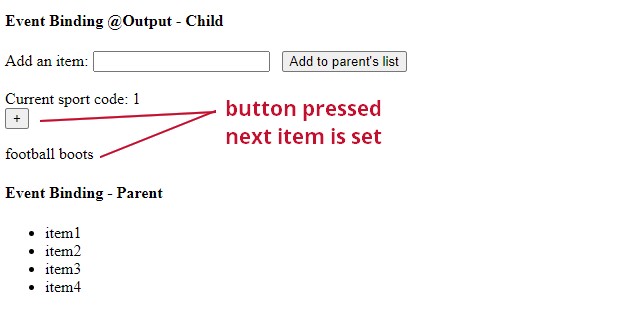
Comparing parent vs. child implementation, you may notice that the child has all the code to make it happen, and the parent just the two properties that sends and receives data.
AFTER PRESSING BUTTON (+)
Two-way Binding – property and method
The image below belongs to the Angular documentation and it is shown at the bottom of this page, but without the respective implementation.
Let’s implement this code as an exercise but adjusting to our pre-existante implementation.
After all, this is our developer’s daily life-style routine, combining and merging code everywhere, every day …
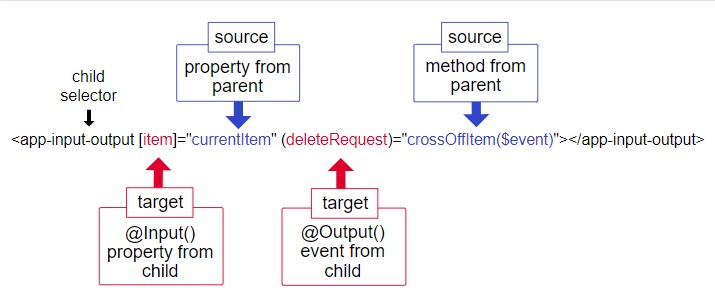
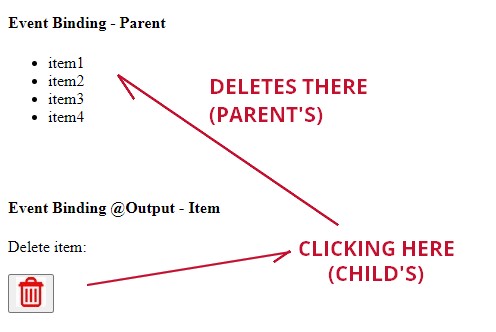
The image above tells us the following:
1. The child select in our implementation will be replaced by the selector created by the new component’s selector (app-app-item).
<app-app-item [item]=”currentItem” (deleteRequest)=”crossOffItem($event)” ></app-app-item>
2. In the child’s source, there is one “@Input” property denoted by “item” and the respective “@Output” event denoted by “deleteRequest”.
3. The parent’s source has one property and one method, respectively denoted by “currentItem” and “crossOffItem(event)”.
Creating the component and Implementing code
ng g c app-item
Opening the app-item.component.ts file created by the command above, we may check the child selector that shall be used in parent’s html file:
@Component({ selector: ‘app-app-item’, templateUrl: ‘./app-item.component.html’, styleUrls: [‘./app-item.component.css’] })
Code Implementation
app.component.ts
  crossOffItem(event: EventEmitter<void>): void {
      this.items.shift();
  }
app-item.component.ts
export class AppItemComponent implements OnInit {

  @Input() item: string;
  @Output() deleteRequest = new EventEmitter<void>();

  constructor() { }

  ngOnInit(): void {
  }

  del(): void {
    this.deleteRequest.emit();
  }

}
app-item.component.html
<h4>Event Binding @Output - Item</h4>

<label>Delete item: {{sportCode}}</label><br /><br />
<button (click)="del()" title="delete"><img src="../../assets/img/delete_30x30.jpg" /></button><br />
app.component.html
<h4>Event Binding - Parent</h4>
<ul>
  <li *ngFor="let item of items">{{item}}</li>
</ul>
<br /><br />
<app-app-item [item]="currentItem" (deleteRequest)="crossOffItem($event)" ></app-app-item>
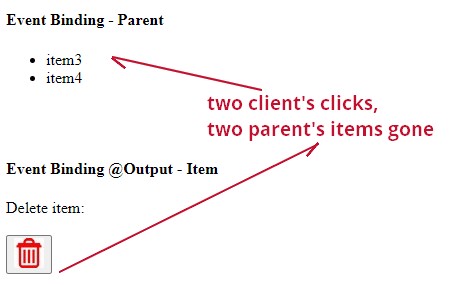
RESULT
Initial status
After two clicks on the garbage
Two-way data binding with ngModel
See Displaying and updating properties with ngModel at Angular documentation
In the app.component.ts file, set:
  person = {
    name: 'Mary',
    lastname: 'Doe'
  };
nameToUppercase(name: string): void {
    this.person.name = name.toUpperCase();
}
In the app.component.html file, append:
<h4>Event Binding using ngModel</h4>
<p>Current item name: {{currentItem}}</p>
<p>
  <label for="example-ngModel">[ngModel]:</label>
  <input [ngModel]="person.name" (ngModelChange)="nameToUppercase($event)" id="example-ngModel">
</p>
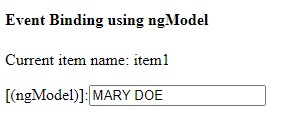
Result
Starts as Person’s name.
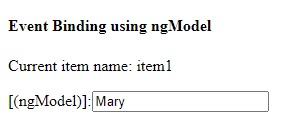
Then typing in the input field, it is converted to upper case:
NOTE: error NG8002
If you get the following error:
error NG8002: Can’t bind to ‘ngModel’ since it isn’t a known property of ‘input’
see the solution at:
alsdias.blogspot.com/2021/03/javascript-error-ng8002-cant-bind-to.html
Summary of the examples from Angular’s Built-in Directives post
<h1>Built-in Directives</h1>

<h2>Built-in attribute directives</h2>

<h3 id="ngModel">NgModel (two-way) Binding</h3>

<fieldset><h4>NgModel examples</h4>
  <p>Current item name: {{currentItem.name}}</p>
  <p>
    <label for="without">without NgModel:</label>
    <input [value]="currentItem.name" (input)="currentItem.name=getValue($event)" id="without">
  </p>

  <p>
    <label for="example-ngModel">[(ngModel)]:</label>
    <input [(ngModel)]="currentItem.name" id="example-ngModel">
  </p>

  <p>
    <label for="example-change">(ngModelChange)="...name=$event":</label>
    <input [ngModel]="currentItem.name" (ngModelChange)="currentItem.name=$event" id="example-change">
  </p>

  <p>
    <label for="example-uppercase">(ngModelChange)="setUppercaseName($event)"
      <input [ngModel]="currentItem.name" (ngModelChange)="setUppercaseName($event)" id="example-uppercase">
    </label>
  </p>
</fieldset>

<hr><h2 id="ngClass">NgClass Binding</h2>

<p>currentClasses is {{currentClasses | json}}</p>
<div [ngClass]="currentClasses">This div is initially saveable, unchanged, and special.</div>
<ul>
  <li>
    <label for="saveable">saveable</label>
    <input type="checkbox" [(ngModel)]="canSave" id="saveable">
  </li>
  <li>
    <label for="modified">modified:</label>
    <input type="checkbox" [value]="!isUnchanged" (change)="isUnchanged=!isUnchanged" id="modified"></li>
  <li>
    <label for="special">special: <input type="checkbox" [(ngModel)]="isSpecial" id="special"></label>
</li>
</ul>
<button type="button" (click)="setCurrentClasses()">Refresh currentClasses</button>

<div [ngClass]="currentClasses">
  This div should be {{ canSave ? "": "not"}} saveable,
                  {{ isUnchanged ? "unchanged" : "modified" }} and
                  {{ isSpecial ? "": "not"}} special after clicking "Refresh".</div>
<br><br>
<!-- toggle the "special" class on/off with a property -->
<div [ngClass]="isSpecial ? 'special' : ''">This div is special</div>
<div class="helpful study course">Helpful study course</div>
<div [ngClass]="{'helpful':false, 'study':true, 'course':true}">Study course</div>


<!-- NgStyle binding -->
<hr><h3>NgStyle Binding</h3>
<div [style.font-size]="isSpecial ? 'x-large' : 'smaller'">
  This div is x-large or smaller.
</div>

<h4>[ngStyle] binding to currentStyles - CSS property names</h4>
<p>currentStyles is {{currentStyles | json}}</p>

<div [ngStyle]="currentStyles">
  This div is initially italic, normal weight, and extra large (24px).
</div>


<br>
<label for="canSave">italic: <input id="canSave" type="checkbox" [(ngModel)]="canSave"></label> |
<label for="isUnchanged">normal: <input id="isUnchanged" type="checkbox" [(ngModel)]="isUnchanged"></label> |
<label for="isSpecial">xlarge: <input id="isSpecial" type="checkbox" [(ngModel)]="isSpecial"></label>
<button type="button" (click)="setCurrentStyles()">Refresh currentStyles</button>
<br><br>
<div [ngStyle]="currentStyles">
  This div should be {{ canSave ? "italic": "plain"}},
                  {{ isUnchanged ? "normal weight" : "bold" }} and,
                  {{ isSpecial ? "extra large": "normal size"}} after clicking "Refresh".</div>

<hr>
<h2>Built-in structural directives</h2>
<h3 id="ngIf">NgIf Binding</h3>
<div>
  <p>If isActive is true, app-item-detail will render: </p>
  <app-item-detail *ngIf="isActive" [item]="item"></app-item-detail>

  <button type="button" (click)="isActiveToggle()">Toggle app-item-detail</button>
</div>
<p>If currentCustomer isn't null, say hello to Laura:</p>
<div *ngIf="currentCustomer">Hello, {{currentCustomer.name}}</div>
<p>nullCustomer is null by default. NgIf guards against null. Give it a value to show it:</p>
<div *ngIf="nullCustomer">Hello, <span>{{nullCustomer}}</span></div>
<button type="button" (click)="giveNullCustomerValue()">Give nullCustomer a value</button>


<h4>NgIf binding with template (no *)</h4>

<ng-template [ngIf]="currentItem">Add {{currentItem.name}} with template</ng-template>
<hr>

<h4>Show/hide vs. NgIf</h4>
<!-- isSpecial is true -->
<div [class.hidden]="!isSpecial">Show with class</div>
<div [class.hidden]="isSpecial">Hide with class</div>

<p>ItemDetail is in the DOM but hidden</p>
<app-item-detail [class.hidden]="isSpecial"></app-item-detail>

<div [style.display]="isSpecial ? 'block' : 'none'">Show with style</div>
<div [style.display]="isSpecial ? 'none'  : 'block'">Hide with style</div>


<hr>
<h2 id="ngFor">NgFor Binding</h2>

<div class="box">
  <div *ngFor="let item of items">{{item.name}}</div>
</div>

<p>*ngFor with ItemDetailComponent element</p>
<div class="box">
  <app-item-detail *ngFor="let item of items" [item]="item"></app-item-detail>
</div>


<h4 id="ngFor-index">*ngFor with index</h4>
<p>with <em>semi-colon</em> separator</p>
<div class="box">
  <div *ngFor="let item of items; let i=index">{{i + 1}} - {{item.name}}</div>
</div>

<p>with <em>comma</em> separator</p>
<div class="box">
 <div *ngFor="let item of items, let i=index">{{i + 1}} - {{item.name}}</div>
</div>

<h4 id="ngFor-trackBy">*ngFor trackBy</h4>
<button type="button" (click)="resetList()">Reset items</button>
<button type="button" (click)="changeIds()">Change ids</button>
<button type="button" (click)="clearTrackByCounts()">Clear counts</button>

<p><em>without</em> trackBy</p>
<div class="box">
  <div #noTrackBy *ngFor="let item of items">({{item.id}}) {{item.name}}</div>

  <div id="noTrackByCnt" *ngIf="itemsNoTrackByCount" >
    Item DOM elements change #{{itemsNoTrackByCount}} without trackBy
  </div>
</div>

<p>with trackBy</p>
<div class="box">
  <div #withTrackBy *ngFor="let item of items; trackBy: trackByItems">({{item.id}}) {{item.name}}</div>

  <div id="withTrackByCnt" *ngIf="itemsWithTrackByCount">
    Item DOM elements change #{{itemsWithTrackByCount}} with trackBy
  </div>
</div>

<br><br><br>

<p>with trackBy and <em>semi-colon</em> separator</p>
<div class="box">
  <div *ngFor="let item of items; trackBy: trackByItems">
    ({{item.id}}) {{item.name}}
  </div>
</div>

<p>with trackBy and <em>comma</em> separator</p>
<div class="box">
  <div *ngFor="let item of items, trackBy: trackByItems">({{item.id}}) {{item.name}}</div>
</div>

<p>with trackBy and <em>space</em> separator</p>
<div class="box">
  <div *ngFor="let item of items trackBy: trackByItems">({{item.id}}) {{item.name}}</div>
</div>

<p>with <em>generic</em> trackById function</p>
<div class="box">
  <div *ngFor="let item of items, trackBy: trackById">({{item.id}}) {{item.name}}</div>
</div>

<hr><h2>NgSwitch Binding</h2>

<p>Pick your favorite item</p>
<div>
  <label for="item-{{i}}" *ngFor="let i of items">
    <div><input id="item-{{i}}"type="radio" name="items" [(ngModel)]="currentItem" [value]="i">{{i.name}}
    </div>
  </label>
</div>

<div [ngSwitch]="currentItem.feature">
  <app-stout-item    *ngSwitchCase="'stout'"    [item]="currentItem"></app-stout-item>
  <app-device-item   *ngSwitchCase="'slim'"     [item]="currentItem"></app-device-item>
  <app-lost-item     *ngSwitchCase="'vintage'"  [item]="currentItem"></app-lost-item>
  <app-best-item     *ngSwitchCase="'bright'"   [item]="currentItem"></app-best-item>
  <div *ngSwitchCase="'bright'"> Are you as bright as {{currentItem.name}}?</div>
  <app-unknown-item  *ngSwitchDefault           [item]="currentItem"></app-unknown-item>
</div>
In this example, since Angular documentation has many useful examples, it’s interesting to bring them in because it is useful as a code repository for later consultation.
The original project may be found here: built-in-directives.zip from Built-in Directives page.
To migrate the ngModel’s examples from built-in-directives.zip it was created two additional packages.
ng g c child-ng
ng g c item-detail
Notice that both packages don’t have the “app” prefix because their code come from external source.
For more details, the source code may be found on GitHub, “step3” tag.
#USEFUL NOTES
Meaning of exclamation mark on @input var
@Input() item!: Item;
In Angular, when you see an exclamation mark (`!`) in front of an `@Input` variable declaration, it indicates that the variable is marked as non-null.
This is a feature introduced in TypeScript called “definite assignment assertions.”
Here’s how it works:
“`typescript
@Input() myInput!: string;
“`
In this example, `myInput` is declared as an `@Input` variable.
The exclamation mark indicates to TypeScript that even though it’s not initialized in the constructor or assigned a value before being used, it will be assigned a value before being accessed at runtime.
This is typically the case when Angular initializes the component and sets the value of the `@Input` property.
Using `!` explicitly tells TypeScript that you, as the developer, are ensuring that the variable will have a value when it’s used, thus avoiding TypeScript compilation errors related to potential null or undefined values.
It’s important to note that using `!` means you’re taking responsibility for ensuring the variable is indeed initialized before use.
If there’s a chance it might not be initialized in certain circumstances, it’s better to handle that case explicitly in your code.
@FROM: ChatGPT
Interrogation mark (`?`) usage
<span>{{item?.name}}</span>
In Angular, when you see an interrogation mark (`?`) used in conjunction with a variable or property, it typically signifies optional chaining or safe navigation in TypeScript.Here are two common uses:
1. **Optional Properties**:
In TypeScript, when you define a property with a question mark (`?`) after its name in an interface or type definition, it means that property is optional.
It can exist or not exist on the object without causing a compilation error.
“`typescript
interface Person {
name: string;
age?: number; // Optional property
}
“`
In this example, the `age` property is optional. Objects of type `Person` may or may not have an `age` property.
2. **Safe Navigation Operator**:
In Angular templates, the safe navigation operator (`?.`) is used to guard against null and undefined values when accessing properties of objects.
“`html
<div>{{ user?.name }}</div>
“`
In this example, if `user` is null or undefined, the expression `user?.name` will gracefully return `null` instead of throwing an error, preventing runtime errors due to accessing properties of null or undefined objects.
Using the `?` operator is a handy way to ensure smoother handling of potentially nullable or undefined variables or properties in both TypeScript code and Angular templates.
@FROM: ChatGPT
CLOSING
This step continues on step-4 where bootstrap will be used to supply a better visual experience.
This source code may be found on GitHub, “step3” tag.
NEXT
Angular From Scratch Tutorial – Index
NEXT: Angular From Scratch Tutorial – Step 4: Adding Bootstrap
PREVIOUS: Angular From Scratch Tutorial – Step 2: Components
Credits
angular.io/guide/architecture
angular.io/guide/architecture-components
angular.io/tutorial
angular.io/guide/glossary#data-binding
angular.io/guide/interpolation
angular.io/guide/architecture-components
www.telerik.com/blogs/understanding-angular-property-binding-and-interpolation
angular.io/guide/event-binding
angular.io/api/core/Output
angular.io/guide/inputs-outputs
ChatGPT
Brazilian system analyst graduated by UNESA (University Estácio de Sá – Rio de Janeiro). Geek by heart.