Angular From Scratch Tutorial – Index
PREVIOUS: Angular From Scratch Tutorial – Step 5: Directives
NEXT: IN PROGRESS, SOON! 🙂
Table of Contents
TARGET
The purpose of this page in this tutorial series is to provide a very fast approach that is useful for revisions when you have already dealt with Angular, but after an absense of using it, it turns necessary to do a “disk swap” bringing from “disk” to your “memory” again. 🙂
If it is your first Angular approach, or you are a newbie, it is recommended to go first to the Angular’s documentation. After, this page will serve you as a summary for fast referencing and revision.
This post bring basic approaches handling Dependency Injection and Services.
The tutorial emulates an in-memory fake database, using class-model approach to create a database service.
Source Code/Download
For more details, the source code may be found on GitHub, “step6” tag (includes step1 up to step3).
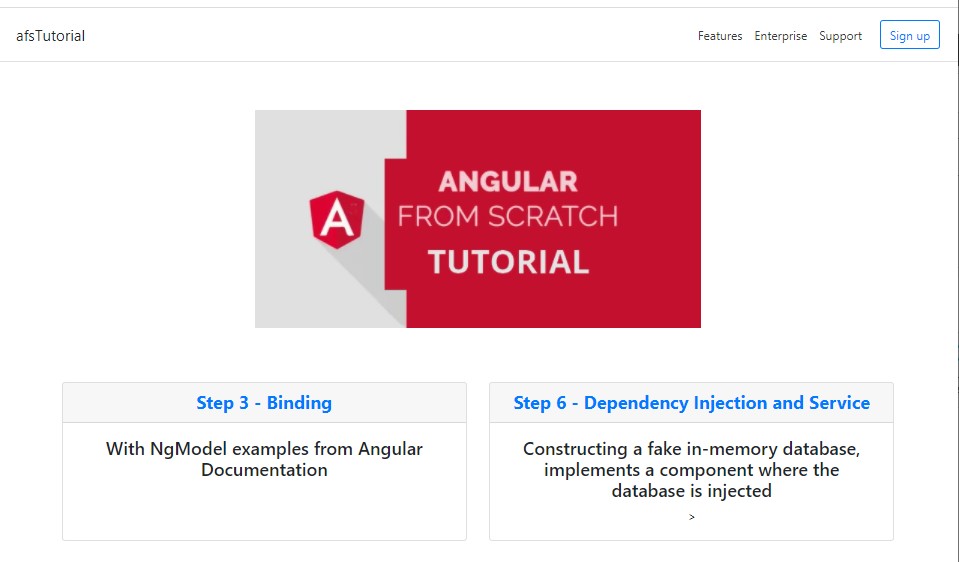
REFACTORING STEP3 – CREATING AN INDEX PAGE (Routing)
The tutorial is growing, as it is a real project in our professional life.
The initial steps took the most simple approach and now it is time to create an index to give to the project better organization and navigation.
A central index may contain navigation to specific pages, each one implemented in its specific component.
To create the page for “binding” subject, it is created the “binding” component, as follows:
ng g c binding
Move the content that shall be in the specific module from app.component.html and app.component.ts to the respective new component’s files.
Make sure to not override the class definition, so split the copies to respect that.
Create a new path on app-routing.module.ts:
import { BindingComponent } from './binding/binding.component';

const routes: Routes = [
  {path: '',   redirectTo: 'index',  pathMatch: 'full'},
  {path: 'ori-init-page', component: OriginalInitPageComponent },
  {path: 'binding', component: BindingComponent }
];

The router directive must be on the entry point, in this example, it is the app\app.component.html page that shall contain:
<router-outlet></router-outlet>
Start the application:
npm start
Point to localhost:4200/binding:
REFACTORING THE HOME PAGE
The content of this page was moved to binding package.
Now, it is time to create its new content to hold the tutorial’s index.
Copy from “app.component.html”:
<div class="d-flex flex-column flex-md-row align-items-center p-3 px-md-4 mb-3 bg-white border-bottom box-shadow">
  <h5 class="my-0 mr-md-auto font-weight-normal">{{title}}</h5>
  <nav class="my-2 my-md-0 mr-md-3">
      <a class="p-2 text-dark" href="#">Features</a>
      <a class="p-2 text-dark" href="#">Enterprise</a>
      <a class="p-2 text-dark" href="#">Support</a>
  </nav>
  <a class="btn btn-outline-primary" href="#">Sign up</a>
</div>
<div class="pricing-header px-3 py-3 pt-md-5 pb-md-4 mx-auto text-center">
  <h1 class="display-4"><img [src]="siteBadge"></h1>
</div>
and paste in “app.component.html”, like this:
<div class="d-flex flex-column flex-md-row align-items-center p-3 px-md-4 mb-3 bg-white border-bottom box-shadow">
  <h5 class="my-0 mr-md-auto font-weight-normal">{{title}}</h5>
  <nav class="my-2 my-md-0 mr-md-3">
      <a class="p-2 text-dark" href="#">Features</a>
      <a class="p-2 text-dark" href="#">Enterprise</a>
      <a class="p-2 text-dark" href="#">Support</a>
  </nav>
  <a class="btn btn-outline-primary" href="#">Sign up</a>
</div>
<div class="pricing-header px-3 py-3 pt-md-5 pb-md-4 mx-auto text-center">
  <h1 class="display-4"><img [src]="siteBadge"></h1>
</div>


<router-outlet></router-outlet>
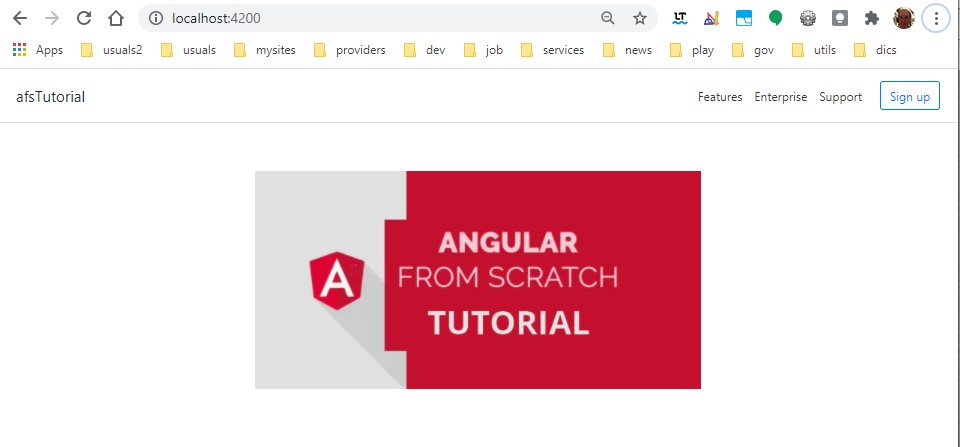
Copy from “binding.component.ts”:
  title = 'afsTutorial';
  siteBadge = '../assets/img/afstutorial_main_image.jpg';
And past to “app.component.ts”:
export class AppComponent implements OnInit {

  title = 'afsTutorial';
  siteBadge = '../assets/img/afstutorial_main_image.jpg';

  constructor() { }

  ngOnInit(): void {
  }

}
Pointing to localhost:4200, we have:
Creating the index
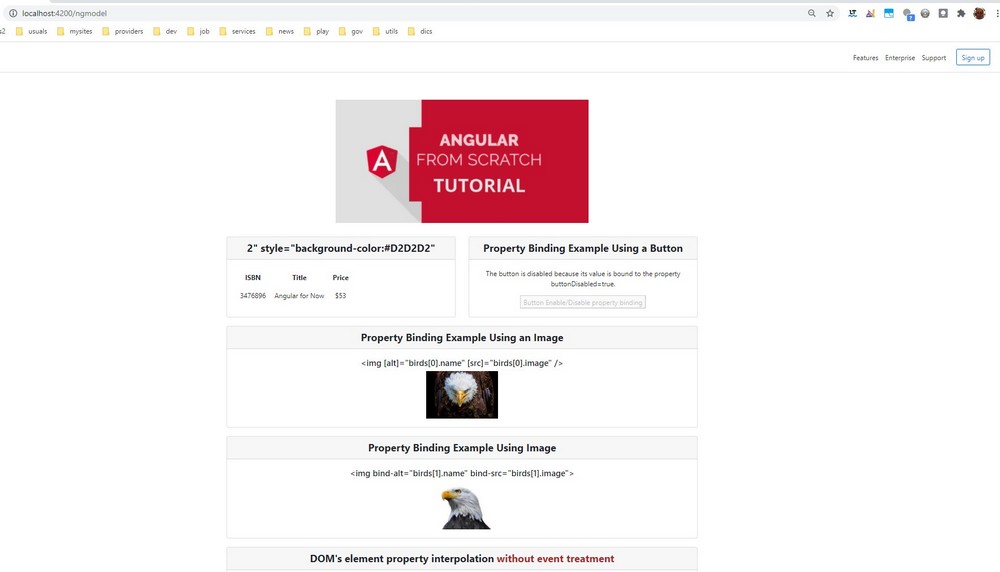
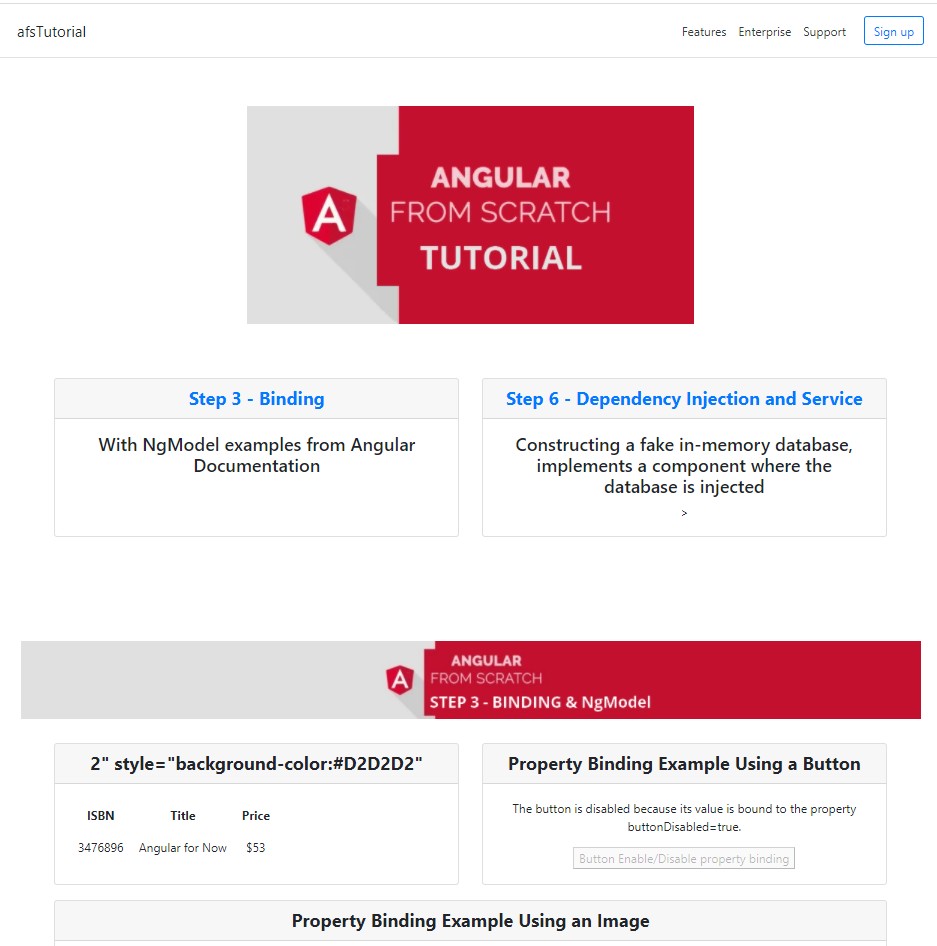
Copy the “cards” from “binding.component.html”:
<div class="container">
  <div class="card-deck mb-12 text-center">
      <div class="card mb-6 box-shadow">
          <div class="card-header">
            <h4 class="my-0 font-weight-bold">{{1 + 1}}" style="background-color:#D2D2D2"</h4>
          </div>
          <div class="card-body">
            <table cellpadding="10px" cellspacing="10px">
              <tr>
                <th>ISBN</th>
                <th>Title</th>
                <th>Price</th>
              </tr>
              <tr>
                <td>3476896</td>
                <td>Angular for Now</td>
                <td>$53</td>
              </tr>
            </table>
          </div>
      </div>
      <div class="card mb-6 box-shadow">
          <div class="card-header">
              <h4 class="my-0 font-weight-bold">Property Binding Example Using a Button</h4>
          </div>
          <div class="card-body">
            <p>The button is disabled because its value is bound to the property buttonDisabled=true.</p>
            <button [disabled]="buttonDisabled">Button Enable/Disable property binding</button>
          </div>
      </div>
  </div>
</div>
We get:
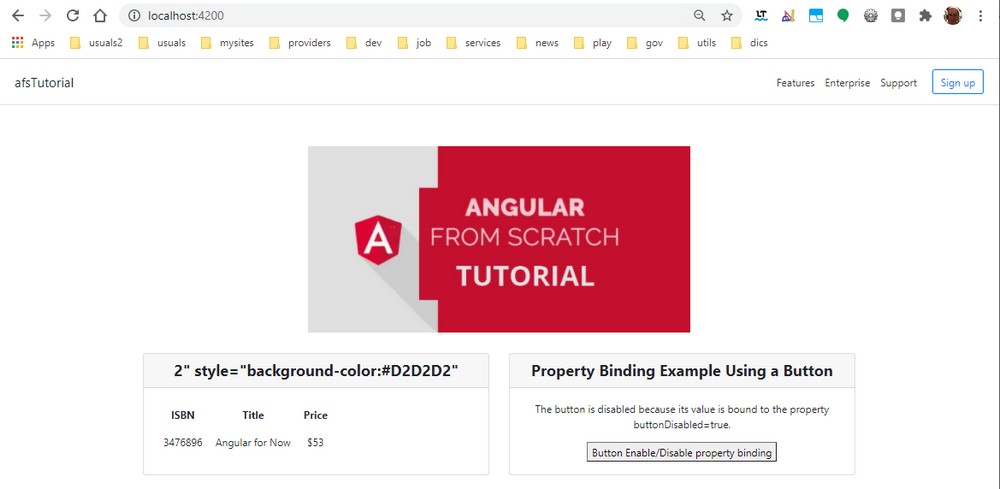
Refactoring the cards to create an index
ADJUSTING THE BINDING PAGE
There some small things to be done on the binding.component.html page.
We need to remove the menu, removing the following code:
<div class="d-flex flex-column flex-md-row align-items-center p-3 px-md-4 mb-3 bg-white border-bottom box-shadow">
  <h5 class="my-0 mr-md-auto font-weight-normal">{{title}}</h5>
  <nav class="my-2 my-md-0 mr-md-3">
      <a class="p-2 text-dark" href="#">Features</a>
      <a class="p-2 text-dark" href="#">Enterprise</a>
      <a class="p-2 text-dark" href="#">Support</a>
  </nav>
  <a class="btn btn-outline-primary" href="#">Sign up</a>
</div>
Also, it was created a new logo for subtitles.
Final result when we point to http://localhost:4200/binding:
CREATING THE SERVICE FOR A FAKE IN-MEMORY DATABASE
ANGULAR AND THE MVC MODEL
A task becomes simple when we split it into smaller parts.
In an MVC (model, view, control) project, the artifacts (classes, etc.) are structured into three main layers.
Angular doesn’t have strict compliance to the MVC structure but in its way applies the same principles.
When a “something” component is created, there are the something.component.ts and something.component.html files under the something folder.
The “.html” file represents the view layer and the “.ts” file represents the model layer.
As you may notice, the view and model layers are scattered into their respective folders (“packages”) throughout the project.
In a simple project, like this, the control layer may be represented by one file, the “app-routing.module.ts”.
Anyway, the MVC concept is embedded into Angular’s way of doing things.
Usually, mapping the domain’s entities is one of the first approaches when beginning a project.
That way, we shall create first the classes that model the database.
After that, we may think about the service that handles those classes to expose the service’s interfaces.
Eventually, the service’s client is usually a component or another service.
The database classes belong to the model/persistence layer.
The entities mapped from the domain belong to the model layer or model/entities layer (names vary but usually round up the same meaning).
A domain has its rules that belong to the model/business.
This structure may not be represented explicitly through the folder’s structure but the concept is still there and helps us to guide ourselves during the project’s implementation.
Other languages, like Java, may have a more strict way of doing things remaining more adherent to the MVC model.
Anyway, the key point is respect to the concept that you apply to the project because this is what leads us to keep the project well structured, organized, and maintainable.
MODELING THE DATABASE
An in-memory database is something as sophisticated as it is a conventional database, except that its data is persisted not on disks but on the server’s memory.
Our database is very simple as it shall be, but I couldn’t call it a mock, because it is not.
It may offer a CRUD operation using OO, working with classes saved in memory, resembling an in-memory Object database.
Our target here is to train using classes with Angular and TypeScript that are handled by an Angular service.
The database is modeled as an object’s table compounded by registries.
A table’s registry has an ID and the respective object.
The object materializes a domain concept, and in this example, we use the Person entity.
Creating person class
It models a person entity.
Run:
ng g c model/person
Then add the following code:
export class Person {

  public name: string;
  public age: number;
  public doc: string;

  constructor(name: string, age: number, doc: string){
      this.name = name;
      this.age = age;
      this.doc = doc;
  }

  print(): string {
    return this.name + ', ' + this.age + ',' + this.doc;
  }
}
Creating the Person’s registry
It models a person’s table registry.
Run:
ng g c model/person-registry
After that, add the following code:
import { Person } from './person.model';

export class PersonRegistry {
  id: number;
  person: Person;
  isDeleted: boolean;

  constructor(id: number, person: Person) {
    this.id = id;
    this.person = person;
    this.isDeleted = false;
  }

  static genFakeRegistries(): PersonRegistry[] {
    const registries = [];
    registries.push(new PersonRegistry(1, new Person('Mary Doe', 30, '123 123')));
    registries.push(new PersonRegistry(2, new Person('John Doe', 31, '123 123')));
    registries.push(new PersonRegistry(3, new Person('Helen Doe', 12, '123 123')));
    return registries;
  }

  print(): string {
    return this.id + ', ' + this.person.print() + ', ' + this.isDeleted;
  }

}
Notice that there is a static method that populates the table with some initial data for the purposes of this tutorial.
To each new Person object it is associated an ID.
Why is the idDeleted attribute for?
This database has logial deletion. When isDeleted=true, the data is considered deleted and the user will not see it.
The data itself remains on the database for security purposes, to be audited and etc.
Creating person-table class
It models the “table”.
Run:
ng g c model/person-table
After creation, add the following code:
import { PersonRegistry } from './person-registry.model';

export class PersonTable {

  personRegistries: PersonRegistry[];

  constructor() {
    // populates
    this.personRegistries = PersonRegistry.genFakeRegistries();
  }

}
CREATING THE SERVICE CLASS
Run:
ng g s model/db
Add the code:
import { Injectable, OnInit  } from '@angular/core';
import { PersonRegistry } from './person-registry.model';
import { PersonTable } from './person-table.model';
import { Person } from './person.model';

@Injectable({
  providedIn: 'root'
})
export class DbService {

  personTable: PersonTable;

  constructor() {
    this.personTable = new PersonTable();
  }

  allPersons(): PersonRegistry[] {
    return this.personTable.personRegistries;
  }

  findPersonById(id: number): PersonRegistry {
    let pr = null;
    for (const idx in this.personTable.personRegistries) {
      if (this.personTable.personRegistries[idx].id === id) {
        pr = this.personTable.personRegistries[idx];
      }
    }
    return pr;
  }

  insert(name: string, age: number, doc: string): void {
    this.personTable.personRegistries.push(new PersonRegistry(2, new Person(name, age, doc)));
  }

}
In a service class, an important thing to highlight is the @Injectable annotation:
@Injectable({
  providedIn: 'root'
})
The “providedIn: root” turns the service visible throughout the application and the @Injectable annotation enables to inject the service into a component.
CREATING THE SERVICE’S CLIENT – THE COMPONENT
Generate the service’s client component:
ng g c fake-db
Add the code to the fake-db.component.ts file:
import { Component, OnInit } from '@angular/core';
import { DbService } from '../model/db.service';
import { PersonRegistry } from '../model/person-registry.model';
import { Person } from '../model/person.model';

@Component({
  selector: 'app-fake-db',
  templateUrl: './fake-db.component.html',
  styleUrls: ['./fake-db.component.css']
})
export class FakeDbComponent implements OnInit {

  siteBadge = '../assets/img/sitebadge_step6.jpg';
  db: DbService;
  persons: string[];
  todaydate: Date;

  constructor(private dbsvc: DbService) {
    this.db = dbsvc;
    this.allPersons();
  }

  ngOnInit(): void {
  }

  allPersons(): void {
    this.persons = [];
    const regs = this.db.allPersons();
    regs.forEach(reg => { this.persons.push(reg.print()); });
  }

}
Notice that “siteBadge” defines the view’s subjects (the page’s badge).
The constructor is responsible for initializing the attributes.
The allPersons() method uses the service to obtain the data and initialize persons. This belongs to the business layer.
An example of a simple business rule that loads all persons to enable their visualization to the user.
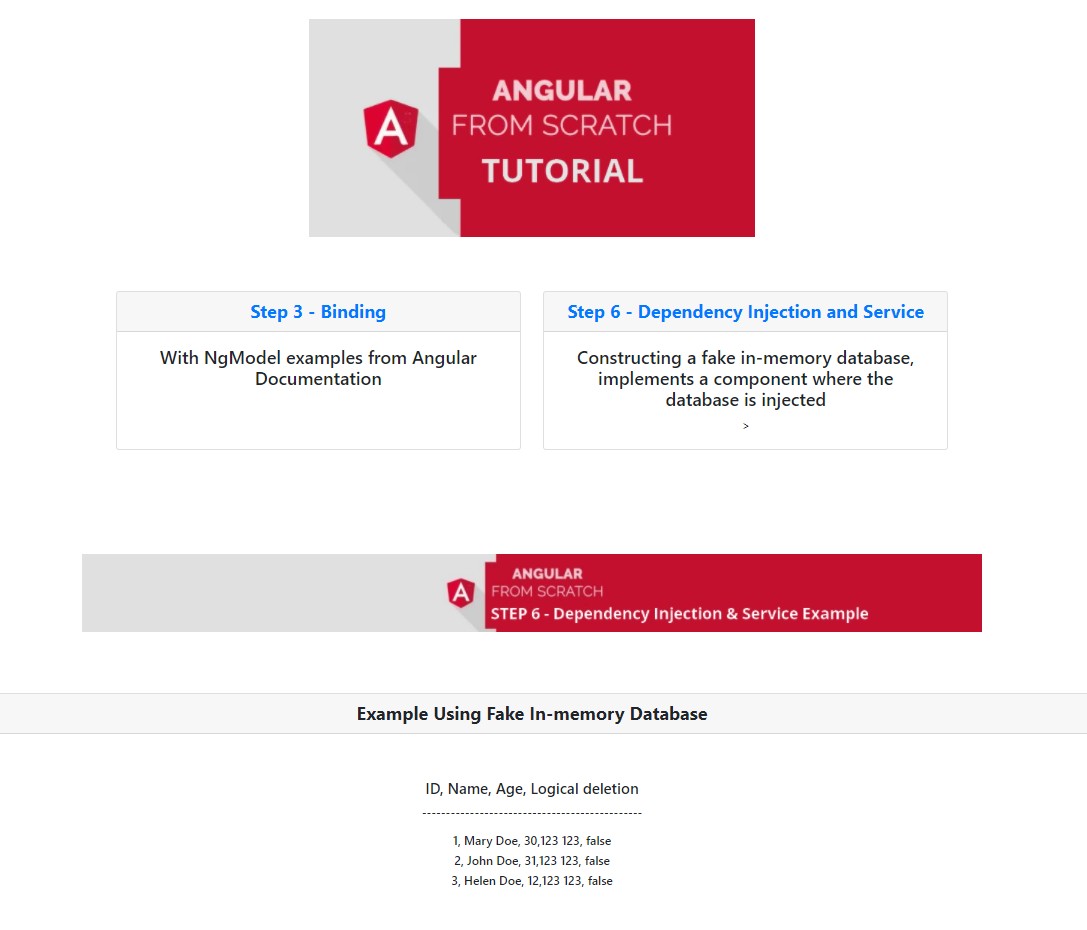
Add the code to the fake-db.component.html file:
<div class="pricing-header px-3 py-3 pt-md-5 pb-md-4 mx-auto text-center" style="margin-top: 90px;">
  <h1 class="display-4"><img [src]="siteBadge"></h1>
</div>

<div class="card mb-12 box-shadow spacer" style="margin-top: 50px;">
  <div class="card-header">
      <h4 class="my-0 font-weight-bold">Example Using Fake In-memory Database</h4>
  </div>
  <div class="card-body" style="margin-top: 40px;">
      <h5>ID, Name, Age, Logical deletion</h5>
      <p>----------------------------------------------</p>
      <h6 *ngFor="let person of persons">{{person}}</h6>
    <br /><br />
  </div>
</div>
Result:
CONCLUSIONS
The objective of this tutorial is to learn how to create an Angular’s service, but as important as to understand how it is done, also it is to comprehend why it is done in that way.
Getting the concepts involved in its architecture leads us to clear and organize our minds to create a good maintainable code. We get the answer to the questions:
Where do I write this piece of code?
How are classes related?
Which order do I follow to create and instantiate the classes?
Where and how do I create each class, component, where do they belong to the structure?
Right answers to such questions are vital for good programming.
NEXT
Angular From Scratch Tutorial – Index
NEXT: Angular From Scratch Tutorial – Step 7: Forms
PREVIOUS: Angular From Scratch Tutorial – Step 5: Directives
Credits
Angular documentation – Dependency Injection in Angular
Brazilian system analyst graduated by UNESA (University Estácio de Sá – Rio de Janeiro). Geek by heart.