Some alternatives to install bootstrap:
– manual install plus jquery via npm,
– via bootstrap’s npm install plus jquery,
– via bootstrap’s npm install plus ngx-bootstrap (with or without jquery install) or
– via bootstrap’s npm install plus ng-bootstrap (with or without jquery install).
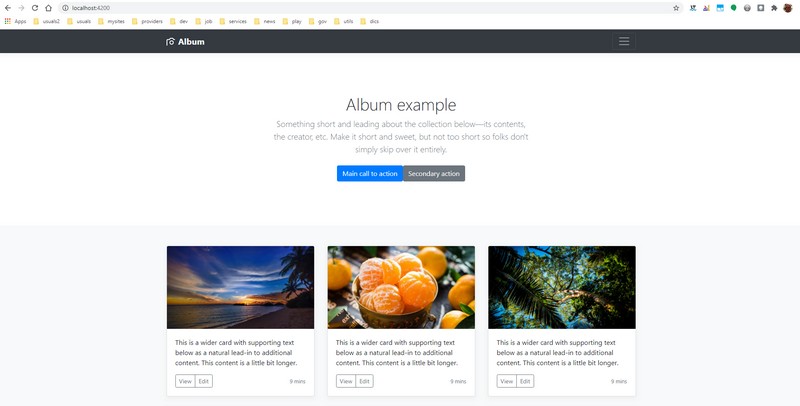
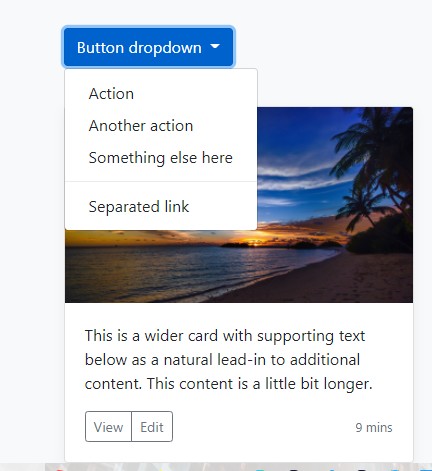
The alternatives are tested using then code of the “Album” template from Bootstrap (image above).
This post goes step-by-step through the first three options, and the forth follows the third.
At the of the text, there is a one-step routine for installing bootstrap/ngx env.
I think it as a summary — the daily routine to set bootstrap in an angular project.
(to reach there faster, press the button of “table of contents”, below)
Table of Contents
ABOUT
1. It is just considered here the “npm” installer.
Please, choose your own, since the results are equivalent.
2. “ngx-bootstrap” and “ng-bootstrap” are both libraries to enable bootstrap features that would require JQuery, but without the need of explicitly installing it.
Transcribing this snippet of comment from Stack Overflow for the sake of our comfort:
I’ve used both ngx-bootstrap(by Valor) and ng-bootstrap(by ng-boostrap). Here are my two cents of the unique features you get from them:
- Builtin animation support on almost everything (modals, accordion, collpase, dropdown, datepicker…)
- Better Modal support (nested modals, modal as a service, modal as a template)
- Sortable Component (with Drag&Drop Feature)
- Nav Feature (Tabset has been made deprecated)
- Builtin Toast component
- Package size is almost half times as ngx-bootstrap (Minified + Gzipped)
You can also compare between their npm download counts with npmtrends.
[Note: My answer is based current latest version i.e ngx-bootstrap v5.5.0 and ng-boostrap v6.0.0]
Alternative site in portuguese:
the difference between ng-bootstrap and ngx-bootstrap (portuguese)
#METHOD 1 – MANUAL INSTALL
1. Download bootstrap:
– latest version:
getbootstrap.com/
– prior versions:
v.3.3
v.3.3.7
v.4.5
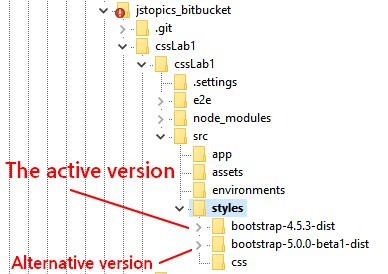
2. Extract to style dir:
mkdir styles
xcopy …\bootstrap-4.5.3-dist ..\PROJECT_ROOT\src\styles /Y/S/I/E
3. Import the CSS.
Two alternatives:
3a. Edit “angular.json” and set:
	"styles": [
		"src/styles.css",
		"src/styles/bootstrap-4.5.3-dist/css/bootstrap.css",
	],
or
3b. Use import:
@import ‘./styles/bootstrap-5.0.0-beta1-dist/css/bootstrap.min.css’;
4. If desired jquery, do:
npm install jquery popper.js –save
Edit angular.json and set:
        "scripts": [
            "node_modules/jquery/dist/jquery.js",
            "node_modules/popper.js/dist/umd/popper.js",
            "node_modules/bootstrap/dist/js/bootstrap.js"
        ]
***IMPORTANT NOTE:
Avoid using CSS resources under assets directory.
When deploying to the production using Angular CLI, the CSS files registered in angular.json are minified and bundled into a single styles.css.
The assets folder is copied to the dist folder during the build process then, the CSS code get duplicated.
Only place CSS files under assets if importing them directly in the index.html.
Download Code at GitHub
METHOD 2 – USING NPM INSTALLER
-
For Bootstrap 3:
npm install bootstrap@3.3.7
-
For Bootstrap 4:
npm install bootstrap@4.5.3
-
For latest Bootstrap version: npm install bootstrap
2. Import the CSS.
Edit “angular.json” and set:
"styles": [
  "src/styles.css",
  "node_modules/bootstrap/dist/css/bootstrap.css",
  "src/styles/css/album.css"
],
3. If desired jquery, do:
npm install jquery popper.js –save
Edit angular.json and set:
        "scripts": [
            "node_modules/jquery/dist/jquery.js",
            "node_modules/popper.js/dist/umd/popper.js",
            "node_modules/bootstrap/dist/js/bootstrap.js"
        ]
NOTE: you join install commands:
npm install bootstrap@4.5.3 jquery popper.js –save
Download Code at GitHub
OBSERVATION
Personally, I do not use the “@import” annotation. Something like this:
@import “../../../node_modules/bootstrap/dist/css/bootstrap.min.css”;
The configuration when is set in “angular.json” file is a much better option.
*IMPORTANT NOTE:
Don’t use the assets directory to set the CSS files. When deploying to the production using Angular CLI, the CSS files registered in angular.json are minified and bundled into a single styles.css. The assets folder is copied to the dist folder during the build process then, the CSS code get duplicated. Only place CSS files under assets if importing them directly in the index.html.
METHOD 3 – USING NGX-BOOTSTRAP
1. Please, perform the same routine used for method 1 or 2.
2. Install ngx-bootstrap.
npm install ngx-bootstrap –save
or
npm i ngx-bootstrap
NOTES:
a. ng2-bootstrap is the errlier name for ngx-bootstrap.
b. Any doubt about the differences between the commands above?
For this example, using npm 6.X, they are equivalents.
More information?
Specifying dependencies and devDependencies in a package.json file
What is the –save option for npm install?
c. The installation may returns some warns like this:
npm WARN optional SKIPPING OPTIONAL DEPENDENCY: …
Go ahead.
If desired, follow its instructions. Example:
found 4 vulnerabilities (3 low, 1 high)
run `npm audit fix` to fix them, or `npm audit` for details
Be prepared, “audit fix” may take some time.
3. Decide the components you wish to use.
Check ngx-bootstrap documentation.
Following the documentation, pick your choices.
4. Next, an example with dropdowns.
Go to the dropdown documentation page.
The documentation shows the configuration required (italic).
5. Edit app.module.ts and set the imports.
Example:
import { BrowserModule } from '@angular/platform-browser';
import { NgModule } from '@angular/core';
import { AppComponent } from './app.component';

import { BrowserAnimationsModule } from '@angular/platform-browser/animations';
// RECOMMENDED
import { BsDropdownModule } from 'ngx-bootstrap/dropdown';
// NOT RECOMMENDED (Angular 9 doesn't support this kind of import)
//import { BsDropdownModule } from 'ngx-bootstrap';


@NgModule({
  declarations: [
    AppComponent
  ],
  imports: [
    BrowserModule,
    BsDropdownModule.forRoot(),
    BrowserAnimationsModule
  ],
  providers: [],
  bootstrap: [AppComponent]
})
export class AppModule { }
NOTES:
a. The .forRoot() method loads each module making available all resources.
b. Alternatively, imports may be declared in a specific module if desired.
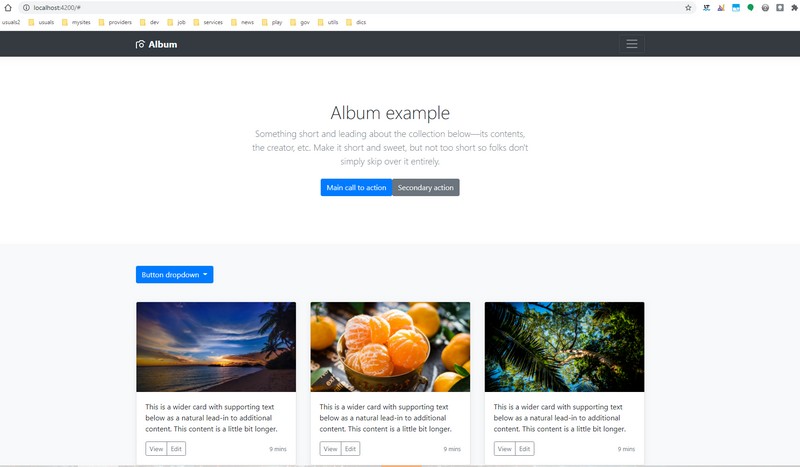
6. Adding the dropdown button to the html page.
Edit “app.component.html” and add an extra row to get a better visualization.
	...
	<div class="container">
		<div class="row" style="margin-bottom: 40px;">
			<div class="col-md-12">
			</div>
		</div>
7. Copy the code from the documentation inside the new row:
	<div class="btn-group" dropdown>
	  <button id="button-basic" dropdownToggle type="button" class="btn btn-primary dropdown-toggle"
			  aria-controls="dropdown-basic">
		Button dropdown <span class="caret"></span>
	  </button>
	  <ul id="dropdown-basic" *dropdownMenu class="dropdown-menu"
		  role="menu" aria-labelledby="button-basic">
		<li role="menuitem"><a class="dropdown-item" href="#">Action</a></li>
		<li role="menuitem"><a class="dropdown-item" href="#">Another action</a></li>
		<li role="menuitem"><a class="dropdown-item" href="#">Something else here</a></li>
		<li class="divider dropdown-divider"></li>
		<li role="menuitem"><a class="dropdown-item" href="#">Separated link</a>
		</li>
	  </ul>
	</div>
8. Set inside the “div column”:
	<div class="row" style="margin-bottom: 40px;">
		<div class="col-md-12">
			<div class="btn-group" dropdown>
			  <button id="button-basic" dropdownToggle type="button" class="btn btn-primary dropdown-toggle"
					  aria-controls="dropdown-basic">
				Button dropdown <span class="caret"></span>
			  </button>
			  <ul id="dropdown-basic" *dropdownMenu class="dropdown-menu"
				  role="menu" aria-labelledby="button-basic">
				<li role="menuitem"><a class="dropdown-item" href="#">Action</a></li>
				<li role="menuitem"><a class="dropdown-item" href="#">Another action</a></li>
				<li role="menuitem"><a class="dropdown-item" href="#">Something else here</a></li>
				<li class="divider dropdown-divider"></li>
				<li role="menuitem"><a class="dropdown-item" href="#">Separated link</a>
				</li>
			  </ul>
			</div>
		</div>
	</div>
9. Start the server.
cd $PROJECT_ROOT
ng serve
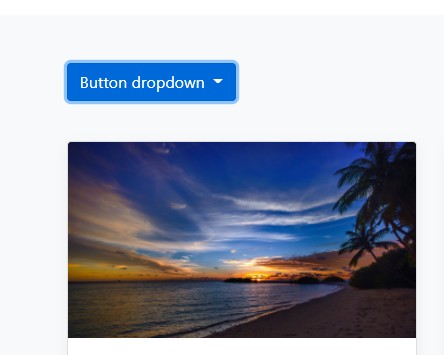
10. Point on browser:
http://localhost:4200/
Download Code at GitHub
SUMMARY FOR DAILY TASKS
This procedure installs: bootstrap , jquery, popper and ngx-bootstrap.
1. Install:
npm install bootstrap jquery popper.js ngx-bootstrap –save
2a. Edit “angular.json” and set:
“styles”: [
“src/styles.css”,
“node_modules/bootstrap/dist/css/bootstrap.css”
],
“scripts”: [
“node_modules/jquery/dist/jquery.js”,
“node_modules/popper.js/dist/umd/popper.js”,
“node_modules/bootstrap/dist/js/bootstrap.js”
]
*** IMPORTANT:
If the angular project was created with other option than CSS, you must set the extension of style files.
Example: if using SCSS, switch to:
“node_modules/bootstrap/dist/css/bootstrap.scss”
3. Edit app.module.ts and set the imports.
Example:
@FROM: https://valor-software.com/ngx-bootstrap/#/dropdowns
import { BrowserModule } from ‘@angular/platform-browser’;
import { NgModule } from ‘@angular/core’;
import { AppComponent } from ‘./app.component’;
import { BrowserAnimationsModule } from ‘@angular/platform-browser/animations’;
// RECOMMENDED
import { BsDropdownModule } from ‘ngx-bootstrap/dropdown’;
// NOT RECOMMENDED (Angular 9 doesn’t support this kind of import)
//import { BsDropdownModule } from ‘ngx-bootstrap’;
@NgModule({
declarations: [
AppComponent
],
imports: [
BrowserModule,
BsDropdownModule.forRoot(),
BrowserAnimationsModule
],
providers: [],
bootstrap: [AppComponent]
})
export class AppModule { }
4. Check ngx features and configuration at:
https://valor-software.com/ngx-bootstrap/
5. Mini code to test the env:
<nav class="navbar navbar-expand-md navbar-dark fixed-top bg-dark">
	<a class="navbar-brand" href="#">Navbar</a>
	<button class="navbar-toggler" type="button" data-toggle="collapse" data-target="#navbarsExampleDefault" aria-controls="navbarsExampleDefault" aria-expanded="false" aria-label="Toggle navigation">
		<span class="navbar-toggler-icon"></span>
	</button>
	<div class="collapse navbar-collapse" id="navbarsExampleDefault">
		<ul class="navbar-nav mr-auto">
			<li class="nav-item active">
				<a class="nav-link" href="#">Home <span class="sr-only">(current)</span></a>
			</li>
			<li class="nav-item">
				<a class="nav-link" href="#">Link</a>
			</li>
			<li class="nav-item">
				<a class="nav-link disabled" href="#">Disabled</a>
			</li>
			<li class="nav-item dropdown">
				<a class="nav-link dropdown-toggle" href="http://example.com" id="dropdown01" data-toggle="dropdown" aria-haspopup="true" aria-expanded="false">Dropdown</a>
				<div class="dropdown-menu" aria-labelledby="dropdown01">
					<a class="dropdown-item" href="#">Action</a>
					<a class="dropdown-item" href="#">Another action</a>
					<a class="dropdown-item" href="#">Something else here</a>
				</div>
			</li>
		</ul>
		<form class="form-inline my-2 my-lg-0">
			<input class="form-control mr-sm-2" type="text" placeholder="Search" aria-label="Search">
			<button class="btn btn-outline-success my-2 my-sm-0" type="submit">Search</button>
		</form>
	</div>
</nav>
<!-- Main jumbotron for a primary marketing message or call to action -->
ADDITIONAL SOURCES
ngx bootstrap | With Bootstrap 3 and 4
How to Add Bootstrap to an Angular CLI project
Brazilian system analyst graduated by UNESA (University Estácio de Sá – Rio de Janeiro). Geek by heart.