Table of Contents
ENVIRONMENT
Java 13
Wildfly 18
Windows 10 / *Nix (also applicable adapting the commands)
DRIVER CONFIGURATION
The trick is to match the requirements of the participants.
They are:
– the application server’s (the way it requires the configuration)
– the target database version (type of database and version)
– the driver compatible with the target database (type and version)
Usually the unsuccessful configuration comes from that one or more of the requirements are not correct.
So, it is necessary to follow a method, step by step, in order to be able to identify each requirement by its turn to get the configuration done faster.
DRIVER DOWNLOAD
MySQL
dev.mysql.com/downloads/connector/j/5.1.html
PostgreSQL
jdbc.postgresql.org/download.html
INSTALLING THE DRIVER ON THE WILDFLY SERVER (JBOSS)
A SYSTEMATIC WAY OF DOING THIS
Here comes the first guess — how to choose it?
Considering that the driver is a connector from the application to the database, it is necessary to consider first the application’s version.
Newer libraries, newer drivers.
The last point is to check if the driver although compatible with the application it is also compatible with the target database — the one to be used by the application.
The first guess is an attempt.
If it fails, it is necessary to try another version still compatible with the application and the database.
I begin by the latest driver’s version for the target application and if it fails, I get the next older driver next to the date of the application’s libraries.
Using an approach top-down you may have the chance to get the latest compatible choice compatible with the target environment.
NOTE: sometimes, when the configuration tests passes, the application may fail for some feature.
In this case, it necessary to reconfigure to another driver older, but compatible with one of the libraries that it is causing the malfunction.
Configuration is all about putting compatible codes to work together.
So, in general, always consider the date that such codes were created and their compatibilities.
INSTALLING THE DRIVE
#1
Prepare your command that it is gonna be used on server’s console to register the driver:
module add –name=com.mysql.driver –dependencies=javax.api,javax.transaction.api –resources=/PATH/TO/DRIVER.JAR
Ex.:
– MySQL:
module add –name=com.mysql.driver –dependencies=javax.api,javax.transaction.api –resources=L:\transp\1___downloads\mysql-connector-java-5.1.49\mysql-connector-java-5.1.49-bin.jar
– PostgreSQL:
module add –name=com.postgres.driver –dependencies=javax.api,javax.transaction.api –resources=L:\transp\1___downloads\postgresql-42.2.12.jar
#2
Start jboss and go to $SERVER_INSTALL_DIR\bin..
#3
Run:jboss-cli.bat
or if *nix: jboss-cli.sh
It returns the prompt:
[standalone@localhost:9990 /]
#4
Run the command prepared above. Using the PostgreSQL cmd:
module add –name=com.postgres.driver –dependencies=javax.api,javax.transaction.api –resources=L:\transp\1___downloads\postgresql-42.2.12.jar
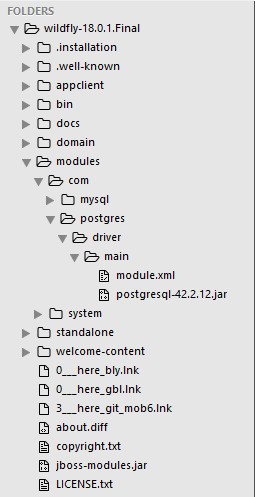
The commandwill create the driver content under
$SERVER_INSTALL_DIR\modules\postgres\driver\main.Check the figure.

The PostgreSQL procedure copies the jar file and creates the module.xml file at:
$SERVER_INSTALL_DIR\\com\postgres\driver\main
<?xml version='1.0' encoding='UTF-8'?>

<module xmlns="urn:jboss:module:1.1" name="com.postgres.driver">

    <resources>
        <resource-root path="postgresql-42.2.12.jar"/>
    </resources>

    <dependencies>
        <module name="javax.api"/>
        <module name="javax.transaction.api"/>
    </dependencies>
</module>
#5
Do the same for MySQL.
REGISTERING THE DRIVER
#1
Edit the standalone.xml file supposing this is the one used by your server.
Sometimes it is used another, for instance the full version.
Check your configuration.$SERVER_INSTALL_DIR\standalone\configuration\standalone.xml..
#2
Add the snippet below used as example, adapting to your need.
IMPORTANT: check below how to discover the “<driver-class>” for your driver.
<driver name="mysql" module="com.mysql.driver">
	 <driver-class>org.gjt.mm.mysql.Driver</driver-class>
</driver>
<driver name="postgres" module="com.postgres.driver">
	 <driver-class>org.postgresql.Driver</driver-class>
</driver>
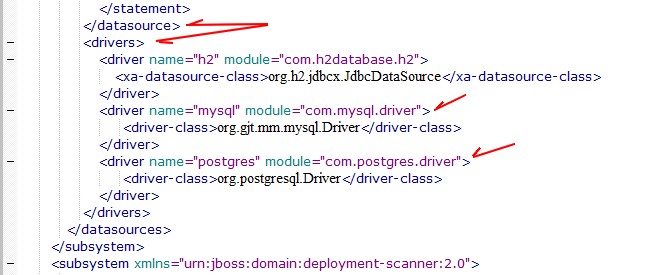
Where?
Follow the picture.

IMPORTANT:
Make sure that you insert in the right place.
Use for you module name the same used in your command.
In this example was:
module add –name=com.postgres.driver …
Discover the “<driver-class>” for your driver.
For instance, suppose the following example using mysql-connector-java-5.1.49.jar.
Copy and rename it to a temporary file as a zip file:
mysql-connector-java-5.1.49.jar.zip
Extract its content and to find where the Driver.class is.
In this example we found it under:
postgresql-42.2.12.jar\org\postgresql\Driver.class
For MySQL, was done the same and found at:
mysql-connector-java-5.1.49-bin.jar\org\gjt\mm\mysql\Driver.class
Turn the subpath to the respective driver name
For PostgreSQL:
org\postgresql\Driver.class ==> org.postgresql.Driver
That becomes the driver-class in the driver element:
<driver-class>org.postgresql.Driver</driver-class>
For MySQL:
org\gjt\mm\mysql\Driver.class ==> org.gjt.mm.mysql.Driver
That becomes the driver-class in the driver element:
<driver-class>org.gjt.mm.mysql.Driver</driver-class>
TESTING THE DRIVER CONFIGURATION
Start Wildfly (JBoss) and check its output on console.
If it returns clean, without any error, it is time to go to the next step, otherwise revise the steps above.
Below, there is an example of the server’s output with a configuration failure:
(“subsystem” => “datasources”),
(“data-source” => “pgTestoneDS”)
]) – failure description: {
“WFLYCTL0412: Required services that are not installed:” => [“jboss.jdbc-driver.postgresql”],
“WFLYCTL0180: Services with missing/unavailable dependencies” => [
“org.wildfly.data-source.pgTestoneDS is missing [jboss.jdbc-driver.postgresql]”,
“jboss.driver-demander.java:jboss/datasources/pgTestoneDS is missing [jboss.jdbc-driver.postgresql]”
] }
13:59:07,758 ERROR [org.jboss.as.controller.management-operation] (Controller Boot Thread) WFLYCTL0013: Operation (“add”) failed – address: ([
(“subsystem” => “datasources”),
(“data-source” => “pgTestoneDS”)
]) – failure description: {
“WFLYCTL0412: Required services that are not installed:” => [
“jboss.jdbc-driver.postgresql”,
“jboss.jdbc-driver.postgresql”
],
“WFLYCTL0180: Services with missing/unavailable dependencies” => [
“org.wildfly.data-source.pgTestoneDS is missing [jboss.jdbc-driver.postgresql]”,
“jboss.driver-demander.java:jboss/datasources/pgTestoneDS is missing [jboss.jdbc-driver.postgresql]”,
“org.wildfly.data-source.pgTestoneDS is missing [jboss.jdbc-driver.postgresql]”
] }
CONFIGURING THE DATABASE’S DATASOURCE
Now, the last step — datasource registering.
The example below is shown as a template that you may adapt to your need.
For PostgreSQL:
<datasource jta="true" jndi-name="java:jboss/datasources/pgTestoneDS" pool-name="pgTestoneDS" enabled="true" use-java-context="true" use-ccm="true">
	<connection-url>jdbc:postgresql://localhost:5432/testone</connection-url>
	<driver>postgres</driver>
	<transaction-isolation>TRANSACTION_READ_COMMITTED</transaction-isolation>
	<pool>
		<min-pool-size>10</min-pool-size>
		<max-pool-size>100</max-pool-size>
		<prefill>true</prefill>
	</pool>
	<security>
		<user-name>postgres</user-name>
		<password>postgres</password>
	</security>
	<statement>
		<prepared-statement-cache-size>32</prepared-statement-cache-size>
		<share-prepared-statements>true</share-prepared-statements>
	</statement>
</datasource>
For MySQL:
<datasource jta="true" jndi-name="java:jboss/datasources/mysqlTestoneDS" pool-name="mysqlTestoneDS" enabled="true" use-java-context="true" use-ccm="true">
	<connection-url>jdbc:mysql://localhost:3306/testone</connection-url>
	<driver>mysql</driver>
	<transaction-isolation>TRANSACTION_READ_COMMITTED</transaction-isolation>
	<pool>
		<min-pool-size>10</min-pool-size>
		<max-pool-size>100</max-pool-size>
		<prefill>true</prefill>
	</pool>
	<security>
		<user-name>root</user-name>
		<password>root</password>
	</security>
	<statement>
		<prepared-statement-cache-size>32</prepared-statement-cache-size>
		<share-prepared-statements>true</share-prepared-statements>
	</statement>
</datasource>
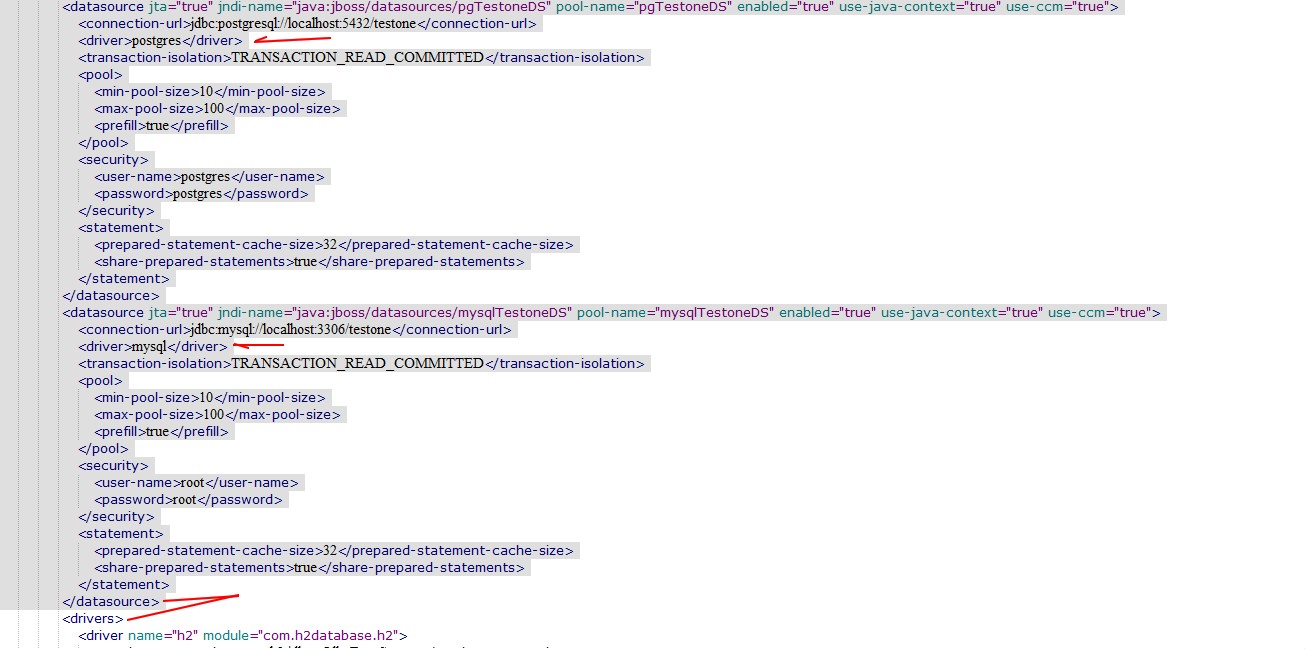
Where to insert it?
After the last <datasource> and before the <drivers> element.
Follow the picture.
IMPORTANT:
The datasource’s driver element:
<driver>postgres<driver>
must match the drive’s name:
<driver name=”postgres” module=”com.postgres.driver”>

Brazilian system analyst graduated by UNESA (University Estácio de Sá – Rio de Janeiro). Geek by heart.